


05/26/22
Overview
The automatic flight-control system (AFCS) is an autopilot and a flight director. The AFCS has the two flight directors that work independently, a two-axis autopilot, and an automatic pitch trim. The AFCS supplies the automatic yaw damper function.
On A/C 20875 to 20936 post SB350-22-002, and A/C 20937 and Subs, the Autothrottle (AT) system provides the flight crew with automatic control of engine thrust.
03/30/22
Flight Guidance Computer (FGC)
The AFCS has two flight guidance computers (FGCs). The flight guidance, autopilot, yaw damper, and automatic pitch trim functions are contained in the FGCs. Each FGC supplies the commands for one flight director. The two FGCs each supply their calculated data to make a fail-passive autopilot. The left FGC also supplies its calculated data for the fail-safe yaw damper. The two FGCs supply the pitch-trim arm and command signals.
During all mode changes, the commands are synchronized to give smooth low-g mode changes. This includes when the autopilot is engaged, or when the flight director changes from pilot to copilot control. To make the autopilot operation smooth, the roll and pitch changes are limited. The roll axis has a bank angle limit and a roll rate limit. The pitch axis has nose-down and nose-up limits, with a pitch rate limit which is a function of airspeed.
The FGCs are the primary components of the AFCS. The FGCs supply the flight director and the autopilot functions for the AFCS. The two FGCs are installed in the integrated-avionics processor system (IAPS) card cage (ICC). The ICC is installed in the RH equipment rack. The FGC is a line replaceable unit (LRU).
The FGC No. 1 is installed in the 1A half (left side) of the ICC. The FGC No. 2 is installed in the 2A half (right side) of the ICC. The FGC module locks into position with tabs at the top and the bottom of the module. The FGC has an electrical connector at the rear which engages the connector in the ICC.
Power Supply
FGC No. 1 receives servo power from two 28 VDC electrical sources. The L MAIN BUS supplies 28 VDC AIL SVO PWR A and TRIM RELAY PWR A to the FGP channel A through circuit breaker B7 on CB-1. The R MAIN BUS supplies 28 VDC ELEV SVO PWR A to the FGP channel A through circuit breaker B7 on CB-2.
FGC No. 2 receives servo power from two 28 VDC electrical sources. The L MAIN BUS supplies 28 VDC AIL SVO PWR B to the FGP channel B through circuit breaker B7 on CB-1. The R MAIN BUS supplies 28 VDC TRIM RELAY PWR B and ELEV SVO PWR B to the FGP channel B through circuit breaker B7 on CB-2.
The IAPS power supplies give controlled DC voltages to the FGCs. The ICC has two power supply modules that operate independently. The IAPS power supply No. 1 supplies DC voltages to the FGC No. 1. The IAPS power supply No. 1 supplies 5 VDC isolation power to the flight guidance panel (FGP). The IAPS power supply No. 2 supplies DC voltages to the FGC No. 2. The IAPS power supply No. 2 supplies 5 VDC isolation power to the FGP.


03/30/22
Flight Guidance Panel (FGP)
The flight guidance panel (FGP) controls the autopilot and flight director functions and adjusts the indications shown on the primary flight display (PFD). The FGP is in the glareshield where both pilots can access it. The FGP has two rear electrical connectors that supply the electrical interface with the other AFCS components.
The FGP is a two-channel unit. The FGP channel A sends data to and gets data from the FGC No. 1. The FGP channel B sends data to and gets data from the FGC No. 2. The FGP has the autopilot and yaw damper engage circuits and interlock relays.
The FGP has 14 pushbuttons, 5 rotary buttons, a command wheel and a disconnect bar.
FD Pushbuttons
There are two flight director pushbuttons, one on each side of the FGP in the top corners. When this pushbutton is pressed, the command bars are shown. When one or more other pushbuttons are pushed, the command bars are shown on the PFDs. When the command bars are shown on the two PFDs and the autopilot is not engaged, if the FD pushbutton in command is pushed, it disengages all FD modes and removes the command bars from both PFDs. In the same condition, if the FD pushbutton not in command is pushed, it removes the command bars from the PFD on that side. In this condition, the other FD pushbutton is pushed to remove the command bars that remain.
NAV Pushbutton
The navigation pushbutton sets or cancels the navigation mode. The navigation mode usually intercepts route segments identified with very high frequency omnidirectional range (VOR) radials. It also intercepts and flies desired flight management system (FMS) tracks.
HDG Pushbutton
The heading pushbutton sets the heading select mode. The heading select mode gives commands to capture and track the selected heading reference (HDG bug).
APPR Pushbutton
The approach mode is used for all approaches, regardless of navigation source or whether a vertical mode is also related with the approach. The approach mode usually selects lateral and vertical steering for instrument landing system (ILS) and FMS. The VOR approach mode is set when the APPR pushbutton is pushed with the navigation receiver tuned to a VOR frequency and set as the active navigation source. The APPR pushbutton arms the localizer and the glideslope modes when the navigation receiver is tuned to an ILS frequency and ILS is set as the active navigation source. Selecting the approach mode when the navigation source is FMS engages the FMS lateral mode the same as described for navigation and also arms vertical navigation (VNAV) for the approach.
FLC Pushbutton
The flight level change pushbutton sets the usual climb/descent profile on the two PFDs. When pushed a second time, it sets the high-speed climb/descent schedule. When pushed a third time, it cancels the mode. The flight director sets the usual or high-speed profile in relation with the aircraft altitude and preselected altitude. There is a FLC annunciation for the usual profile and a FLCH for the high-speed profile.
VS Pushbutton
The vertical speed pushbutton sets the vertical speed mode. This mode is inhibited during approach mode, capture/track, or overspeed mode.
When the vertical speed is in operation, the system keeps the vertical speed reference. The vertical reference is set to the current vertical speed at the time of mode selection. After mode selection, rotation of the VS/pitch wheel slews the vertical speed reference in the direction of knob rotation. Range is ± 8000 ft/min (2438.4 m/min). When VNAV is the active vertical mode, the FMS can cancel vertical speed mode. When the VNAV mode is set or canceled, it does not cancel the vertical speed mode.
CRS Button
The left CRS button sets the pilot course on the left PFD in relation to the aircraft course, as shown on the navigation source display. The left CRS button is connected to a rotary three-state logic generator. The logic generator gives the No. 1 CRS SELECT DISCRETES OUT signal to the display control panel (DCP) No. 1. The DCP No. 1 reads the signals to get the direction and speed of the CRS button.
The right CRS button sets the copilot course on the right PFD in relation to the aircraft course, as shown on the navigation source display. The right CRS button is connected to a rotary three-state logic generator. The logic generator gives the No. 2 CRS SELECT DISCRETES OUT signal to the DCP No. 2. The DCP No. 2 reads the discretes to find the direction and speed of the CRS button.
The CRS buttons have a middle PUSH DIRECT pushbutton. When the pilot or copilot pushes the PUSH DIRECT pushbutton, the No.1 or No.2 CRS DIRECT TO DISCRETE OUT is grounded. It makes the applicable course arrow turn until station deviation is zero.
1/2 BANK Pushbutton
The 1/2 BANK pushbutton sets the half bank mode. The half bank mode reduces the maximum commanded bank angle to 15 degrees which is approximately the half of the normal.
HDG Button
The HDG button is connected to two three-state logic generators, and the PUSH SYNC pushbutton has two connections. One of the logic generator gives the No. 1 HDG SELECT DISCRETES OUT to the DCP No. 1. The other logic generator gives the No. 2 HDG SELECT DISCRETES OUT to the DCP No. 2. The DCP reads the discretes to find the direction and speed of the HDG button.
The HDG button has a middle PUSH SYNC pushbutton. When the pilot pushes the PUSH SYNC pushbutton, the No. 1 HDG SYNC DISCRETE OUT and the No. 2 HDG SYNC DISCRETE OUT are grounded. The PUSH SYNC pushbutton causes the heading bug to move below the lubber line.
B/C Pushbutton
The B/C pushbutton sets and cancels the back course (B/C) mode. The back course mode gives commands to capture and track the set localizer (LOC) B/C.
SPEED Button
The SPEED button does the selection of the set airspeed reference bug (Speed Bug). When turned clockwise, it increases the value of the Speed Bug. When turned counterclockwise, it decreases the value of the Speed Bug.
The SPEED button is connected to two three-state logic generators. One of the logic generator gives the No.1 SPEED SELECT DISCRETES OUT to the DCP No.1. The other logic generator gives the No.2 SPEED SELECT DISCRETES OUT to the DCP No.2. The DCP reads the discretes to find the direction and speed of the SPEED button.
The SPEED button has a middle PUSH IAS/MACH pushbutton. When the pilot pushes the PUSH IAS/MACH pushbutton, the No.1 IAS/MACH SELECT DISCRETE OUT and No.2 IAS/MACH SELECT DISCRETE OUT are grounded. The PUSH IAS/MACH pushbutton sets the indicated airspeed (IAS) or Mach mode speed reference.
VNAV Pushbutton
The VNAV pushbutton sets and cancels the VNAV mode. The VNAV is not a true mode, but it lets the FMS to give commands to different vertical modes. It also gives the reference related with those modes.
VS/Pitch Command Wheel
The vertical speed/pitch command wheel is a wheel assembly that is connected mechanically to a rotary switch. The VS/pitch command wheel sets the vertical speed reference when the vertical speed mode is active. It also sets the pitch reference angle when the pitch hold mode is active.
ALT Pushbutton
The ALT pushbutton sets the altitude hold mode. The altitude hold mode gives commands to track the current altitude.
AP Pushbutton
The AP pushbutton is used to engage the autopilot and yaw damper. When the autopilot is engaged, a push of the AP pushbutton will disengage the autopilot, but not the yaw damper.
The discrete inputs that follow must be correct to engage the autopilot:
- AP ENGAGE ENABLE A and B IN (28 VDC)
- AP DISCONNECT SW A and B (28 VDC)
- STALL CHANNEL A and B DISENGAGE IN (open)
- PITCH DISCONNECT IN (open)
- ROLL DISCONNECT IN (open)
- HST ECU (PRI) ENGAGE STATUS IN (open)
- GO AROUND A and B (open)
When the discrete inputs are correct, the FGP has internal interlock-relays that are closed. The interlock relays supply the 28 VDC for the elevator and aileron clutch power. When the AP engage button is pushed, the 28 VDC is supplied to the ELEV CLUTCH ENGAGE OUT and AIL CLUTCH ENGAGE OUT lines.
YD Pushbutton
The YD pushbutton is used to engage and disengage the yaw damper. When the yaw damper is disengage with the autopilot engaged, it also disengages the autopilot.
ALT Button
The ALT button sets the preselect altitude value on the PFD. The altitude preselect mode reads the preselect altitude value. The ALT button is turned clockwise to increase the preselect altitude and counterclockwise to decrease the preselect altitude. The ALT button has two positions, a normal and pushed position. When the button is in the usual position, the preselect altitude increments are 1,000 ft or 100 m. When the button is pushed, the preselect altitude increments are 100 ft or 10 m.
The PUSH CANCEL button, in the ALT button, cancels the aural and visual signals caused by the altitude preselect mode.
The ALT button is connected to two three-state logic generators, and the PUSH CANCEL pushbutton has two connections. One of the logic generators gives the No. 1 PRESEL ALT SELECT DISCRETES OUT to DCP No. 1. The other logic generator gives the No. 2 PRESEL ALT SELECT DISCRETES OUT to DCP No. 2. The DCP reads the discretes to find the direction and speed of the ALT button.
When the pilot pushes the PUSH CANCEL pushbutton, the No. 1 ALTITUDE ALERT CANCEL DISCRETE OUT and No. 2 ALTITUDE ALERT CANCEL DISCRETE OUT are grounded.
XFR Pushbutton
The XFR pushbutton sets the pilot side or copilot side flight-guidance channel. The steering commands from the set flight guidance channel operate the autopilot servos. When the system is power-up, the pilot side flight-guidance channel is set. When the XFR pushbutton is pushed, it transfers to the cross-side flight guidance channel. When the transfer occurs, the flight guidance channel automatically sets the cross-side flight director.
AP/YD DISC Bar
The AP/YD DISC bar disconnects the ELEV CLUTCH ENGAGE OUT, AIL CLUTCH ENGAGE OUT, and RUDDER YD A ENGAGE OUT. The AP/YD DISC bar stays in the down position. The AP/YD DISC bar must be set to the up position to engage the autopilot or yaw damper.
Power Supply
The IAPS power supply No. 1 gives the isolated 5 VDC power to the channel A side of the FGP. The IAPS power supply No. 2 gives the isolated 5 VDC power to the channel B side of the FGP.
The 5 VDC isolation power operates the control circuits in the FGP. The FGP receives power from two 28 VDC electrical sources. The L MAIN BUS supplies 28 VDC POWER A to the FGP channel A through circuit breaker B7 on CB-1. The R MAIN BUS supplies 28 VDC POWER B to the FGP channel B through circuit breaker B7 on CB-2.
The pilot and copilot disconnect switches are connected to relays that open a discrete input and cause the autopilot to disconnect. The pilot disconnect switch is usually closed and grounds the pilot disconnect relay. The 28 VDC from the L ESS BUS energizes the pilot disconnect relay through circuit breaker C5 on CB-3. The copilot disconnect switch is usually closed and grounds the copilot disconnect relay. The 28 VDC from the R ESS BUS energizes the copilot disconnect relay through circuit breaker C6 on CB-4.
The AUTOPILOT SWITCH PWR (+) A OUT signal gives the 28 VDC logic through the pilot and copilot disconnect relay contacts to the AP DISCONNECT SW A discrete input. The AUTOPILOT SWITCH PWR (+) B OUT signal gives 28 VDC logic through the pilot and copilot disconnect relay contacts to the AP DISCONNECT SW B discrete input. A disconnect switch opens the disconnect relay and the AP DISCONNECT SW A/B discrete input goes to a logic 0. The FGP removes power from the ELEV CLUTCH ENGAGE OUT and AIL CLUTCH ENGAGE OUT signals and disengages the autopilot servos.
Go-Around
The go-around switches are installed in the throttle levers. The GO AROUND A and GO AROUND B discrete inputs are usually open. When the pilot or copilot go-around switch is pushed, the GO AROUND A and GO AROUND B discrete inputs are grounded. The FGP removes power from the ELEV CLUTCH ENGAGE OUT and AIL CLUTCH ENGAGE OUT signals and disengages the autopilot servos. The flight director displays, on the PFD, show a wings-level and pitch-up attitude.


Aileron Servo Mount
The aileron servo mount is in the main landing gear compartment, on the right side, at FS631. The aileron servo mount does not have electrical connections. The aileron servo mount has the servo-to-aircraft mounting plate, capstan output gear, adjustable override clutch, and output capstan.
The servo-to-aircraft mounting plate has a rigid mounting surface to attach the servo mount to the structure and to attach the servo to the mount. It is possible to remove the servo from the aircraft and not move the servo mount or the rigging to the aircraft control surfaces.
The capstan output gear gives the mechanical interface between the aileron servo output gear and the input-side of the adjustable override clutch. The output-side of the override clutch is connected to the output capstan of the servo mount. If a servo failure occurs that prevents the servo rotation, the override clutch enables the pilot to move the control surfaces. The pilot applies more force to the flight controls until the override clutch lets the output capstan turn.
The output capstan turns and moves the rigging cables. The rigging cables connect the servo mount with the aileron control surfaces.

02/18/26
Elevator Servo Mount
The elevator servo mount is installed in the rear fuselage at FS824. The elevator servo mount does not have electrical connections. The elevator servo mount has the servo-to-aircraft mounting plate, the capstan output gear, an adjustable override clutch, and the output capstan.
The servo-to-aircraft mounting plate has a rigid mounting surface to attach the servo mount to the structure and to attach the servo to the mount. It is possible to remove the servo from the aircraft and not move the servo mount or the rigging to the aircraft control surfaces.
The capstan output gear gives the mechanical interface between the elevator-servo output-gear and the input-side of the adjustable override clutch. The output-side of the override clutch is connected to the output capstan of the servo mount. If a servo failure occurs that prevents the servo rotation, the override clutch lets the pilot move the control surfaces. The pilot applies more force to the flight controls until the override clutch lets the output capstan turn.
The output capstan turns and moves the rigging cables. The rigging cables connect the servo mount with the elevator control surfaces.

Aileron Servo
The aileron servo attaches to the aileron servo mount. The aileron servo is in the main wheel well at FS631. The servo can be removed or installed to the servo mount without adjusting the aircraft rigging. The aileron servo has an electromagnetic engage clutch, permanent-magnet DC motor, and precision multistage gear train.
The FGP supplies the AIL ENGAGE IN signal to the aileron servo. The 28 VDC AIL ENGAGE IN signal causes the electromagnetic engage clutch to connect the motor output to the precision multistage gear train.
The FGCs give the drive signals to the aileron servo. The FGC No. 1 supplies the AIL SERVO MOTOR A drive signal. The FGC No. 2 supplies the AIL SERVO MOTOR B drive signal. The drive signals cause the servo motor to operate and turn the precision multistage gear train. The gear train has an output gear that transmits the servo motor torque to the capstan. The capstan output gear moves the aileron control surfaces.
The aileron servo has a two-rate generator. The generator sends rate feedback to the FGCs. The aileron servo sends the AIL SERVO TACH A OUT feedback signal to the FGC No. 1. The aileron servo sends the AIL SERVO TACH B OUT feedback signal to FGC No. 2. The FGCs monitor for normal operation of the servo, too much feedback error, or too much servo current.


Elevator Servo
The elevator servo attaches to the elevator servo mount . The elevator servo is in the rear fuselage at FS824. The servo can be removed or installed to the servo mount without adjusting the aircraft rigging. The elevator servo has an electromagnetic engage clutch, permanent-magnet DC motor, and precision multistage gear train.
The FGP supplies the ELE ENGAGE IN signal to the elevator servo. The 28 VDC ELE ENGAGE IN signal causes the electromagnetic engage clutch to connect the motor output to the precision multistage gear train.
The FGCs give the drive signals to the elevator servo. The FGC No. 1 supplies the ELE SERVO MOTOR A drive signal. The FGC No. 2 supplies the ELE SERVO MOTOR B drive signal. The drive signals cause the servo motor to operate and turn the precision multistage gear train. The gear train has an output gear that gives the servo motor torque to the capstan. The capstan output gear moves the elevator control surfaces.
The elevator servo has a two-rate generator. The generator sends rate feedback to the FGCs. The elevator servo sends the ELE SERVO TACH A OUT feedback signal to FGC No. 1. The elevator servo sends the ELE SERVO TACH B OUT feedback signal to FGC No. 2. The FGCs monitor for unusual operation of the servo for too much feedback error or for too much servo current.


Master Disconnect Switch (MSW)
There are two autopilot disconnect switches (MSW), one for the pilot and one for the copilot. The switches are on the pilot and copilot control wheels . The master disconnect switch disengages the autopilot function. When the switch is pushed with the autopilot engaged, a red AP annunciation appears on the PFD and the autopilot audio warning is heard for approximately three seconds.
In the event that a system fault causes the autopilot to disengage, a push on one master disconnect switch or the other cancels the red AP annunciation and audio warning is muted.
The AP DISCONNECT SW A and AP DISCONNECT SW B discrete inputs to the FGCs are usually 28 VDC. When the pilot/copilot master disconnect switch is pushed, the pilot/copilot disconnect relay opens. The open relay causes the AP DISCONNECT SW A and AP DISCONNECT SW B discrete inputs to become 0 VDC. The FGP disengages the aileron and elevator servo clutch power.

Autopilot/Flight Director Synchronization (AP/FD SYNC) Switch
There are two AP/FD SYNC switches, one for the pilot and one for the copilot. A switch is installed on each control wheel.
The PILOT AP SYNC and COPILOT AP SYNC discrete inputs to the FGP are usually open. When the pilot AP/FD SYNC switch is pushed, the AP/FD SYNC A discrete input is grounded. When the copilot SYNC switch is pushed, the AP/FD SYNC B discrete input is grounded. A ground on one of the AP/FD SYNC inputs causes a relay to open the ELEV CLUTCH ENGAGE OUT and AIL CLUTCH ENGAGE OUT signals, which releases the servo clutches. This condition (in which the autopilot stays engaged, but the clutch lines are low) is AP SYNC.
The pilot will be in manual control of the aircraft to maneuver the aircraft to move to a different reference. When the AP/FD SYNC switch is released, the AP/FD SYNC discrete inputs are open. The FGCs set the new reference attitude. The ELEV CLUTCH ENGAGE OUT and AIL CLUTCH ENGAGE OUT signals give 28 VDC to the servos and engage the servo clutches. To synchronize the flight director to the new reference, the flight director synchronization (FD SYNC) function is used.

05/26/22
System Operation
Flight Guidance Operation
Flight guidance is the result of the FGC calculated data and logical processes which control the flight director and autopilot. The flight director is the result of steering commands and related mode annunciations that show on the PFD.
When the flight director is turned on, the flight director command bars show on the PFD. When the flight director is turned off, the flight director command bars do not show on the PFD.
For most cruise modes, the same flight guidance calculated data gives the steering commands on the two PFDs. This is dependent operation. For the approach, take-off, and go-around modes, the two computations show on their own PFD. Since the calculated data uses independent sensor data, this is independent operation.
When the word coupled is used, the calculated data of a given channel controls the servos. Flight guidance is coupled to the pilot side when the autopilot is engaged and the XFR pushbutton is set left. Flight guidance is coupled to the copilot side when the autopilot is engaged and the XFR pushbutton is set right.
The on-side channel is the channel set by the XFR pushbutton. The off-side channel is the channel not set by the XFR pushbutton. The pilot's channel can be on-side or off-side in relation to the condition of the XFR pushbutton, and conversely, the copilot's channel. When the XFR pushbutton is set right, the system is transferred.
When the word active is used in relation to a mode, this mode gives the flight guidance commands. A mode can be set and not set, but is not active. A mode must be set to be armed or to become active. Modes are usually set by the push of a pushbutton on the FGP. At times they are set automatically by a sequence of operational events (such as the overspeed state of the flight level change (FLC) mode when the aircraft has exceeded the operational boundaries). A vertical mode can also be set automatically by the flight management system when VNAV mode is active.
When a mode is in the armed state, it is set, but not active until another event occurs. For example, the approach mode is armed when set. But, it does not move to the capture state until the navigation signal source is valid and the capture states occur. Modes that do not have an arm state become active when they are set, such as the go around mode.
When a mode is in the capture state, it gives commands to get a defined path in space, such as a specific altitude.
When a mode is in the track state, commands are given to stay at a defined path in space (such as glideslope track). Annunciations are the text messages, on the PFD, that show the current operational modes of the flight director. Other flight compartment indications, such as aural tones and warning lights, are also annunciations.

Basic Flight-Director Mode
When the AFCS is engaged but the pilot does not set a vertical or lateral mode selection, the AFCS automatically enters the basic pitch and roll hold modes. The AFCS then shows the flight director command bars on the PFD. The flight director command bars show in the single cue (V-bar) or split cue (cross-pointer) format. The pilot sets the command bar format on the REFS 4/4 menu on the PFD.
The basic vertical mode is the pitch hold mode. If the autopilot is engaged, the vertical speed/pitch wheel adjusts the pitch attitude. When the autopilot is not engaged, the vertical speed/pitch wheel only adjusts the vertical speed value for the flight director function. The vertical speed/pitch wheel is used to make the pitch hold selection (but not if the glideslope capture or vertical speed mode is in operation). The wheel has no function when the aircraft is in the glideslope.
The basic lateral mode is the roll mode. If the bank is less than 5°, then the heading is held. If the bank is more than 5°, then the bank is held.
The AFCS lateral and vertical modes are shown above the attitude display indicator on the PFD. The lateral modes show on the left side and the vertical modes show on the right side. The active (capture) modes are shown in green, on the top line. The armed modes are shown in white, on the second line. The EFIS has more data about the PFD displays.

Lateral Modes
The AFCS has the following lateral flight guidance modes:
- Roll (basic)
- Heading (HDG)
- Navigation (NAV)
- Approach (APPR)
- Go-around (GA)
- Half-bank (1/2 BNK)
- Back course (B/C)
- Takeoff (TO)
Roll Mode
The roll mode is the basic lateral mode. The roll mode is active when no other lateral modes are active and one of the two flight directors is on, or the autopilot is engaged. The roll mode shows ROLL (green) in the lateral capture field on the PFD.
The roll mode has the heading hold and bank hold states. The heading hold state uses the calculated data to hold the heading of the aircraft. The bank hold state uses the calculated data to hold the bank angle of the aircraft.
The roll heading hold is automatically set (no switch on the panel) if the roll attitude is less than or equal to 5 degrees and the flight guidance is turned on. The roll heading hold is also automatically set if the autopilot is engaged, or another active lateral mode has been cancelled. The roll heading hold gives the commands to hold the heading hold reference.
The roll bank hold is automatically set (no switch on the panel) if the roll attitude is more than 5 degrees and the flight guidance is turned on. The roll bank hold is also automatically set if the autopilot is engaged, or another active lateral mode has been cancelled. The roll bank hold gives the commands to hold the reference roll attitude.

Heading Mode
In the heading mode, the flight guidance gives the commands to capture and track the heading reference selection that shows on the PFD. The HDG button on the FGP (synchronized to the current heading, or adjusted by the FMS) is turned to adjust the heading reference selection. The commands are given to turn in the same direction that the HDG button was turned. The digital heading readout and the heading bug show on the PFD. The heading mode gives flight director commands to align with the heading selection. The PUSH SYNC pushbutton is inset on the HDG button on the FGP. The PUSH SYNC pushbutton aligns the heading reference selection to the current heading. The heading mode shows HDG (green) in the lateral capture field on the PFD.
The heading mode is set as follows:
- HDG pushbutton on the FGP, is pushed
- NAV pushbutton on the FGP, is pushed and NAV capture has not occurred
- APPR pushbutton on the FGP, is pushed and APPR capture has not occurred
- B/C pushbutton on the FGP, is pushed and B/C capture has not occurred

Navigation Mode
The navigation mode gives the commands to capture and track lateral guidance for en route navigation and non-precision approaches. The navigation mode is used for approach guidance from an FMS, VOR or localizer (front course).
The navigation mode has the arm and capture/track states. The navigation mode is armed when the mode is set. The mode does not capture until the FGC receives valid navigation data. When the mode is armed, the FGC uses the heading select mode as the active mode. The heading select mode is the active mode until the navigation mode is captured or an FMS forced capture occurs.
When the lateral navigation signal is captured, the navigation mode becomes active. The navigation mode then gives the commands to track the active navigation source.
The navigation mode arm state is set as follows:
- VOR navigation arm state set when the NAV pushbutton on the FGP is pushed and VOR is the navigation source selection
- Localizer navigation arm state set when the NAV pushbutton on the FGP is pushed and LOC is the navigation source selection
- FMS navigation arm state set when the NAV pushbutton on the FGP is pushed and FMS is the navigation source selection
The FGC logic allows continued LNAV control if go-around is selected by the pilot while FMS LNAV is armed/captured in air.
When the navigation mode is captured, the mode is automatically cancelled again when a different lateral mode is set. The mode is also automatically cancelled again if the navigation source signal is changed.
The navigation mode arm states show the following annunciations on the PFD:
- LNV (white)
- VOR (white)
- LOC (white)
- HDG (green) in lateral capture field.
The VOR, or LOC navigation capture/track state is set when the capture states occur and the parameters necessary to computer guidance (includes the navigation source) are valid. If a LOC navigation source is captured while the half-bank mode is set, the half-bank mode is cancelled.
The FMS navigation capture/track state is set when the FMS causes capture and the FMS source is valid.
The navigation mode capture/track states show the following annunciations on the PFD:
- DR (white)
- LNV (green)
- VOR (green)
- LOC (green)

Approach Mode
The lateral approach mode gives commands to capture and track lateral guidance for ILS precision localizer approaches. The lateral approach mode also gives commands to capture and track lateral guidance for FMS or VOR nonprecision approaches. The lateral approach mode operates with the vertical approach mode to track the ILS precision or FMS nonprecision approaches.
The lateral approach mode has the arm and capture/track states. The lateral approach mode is armed when the mode is set. The mode does not capture until the FGC receives valid navigation data. When the mode is armed, the FGC uses the heading select mode as the active mode until the navigation mode is captured.
For localizer and VOR approaches, the aircraft closure rate to the target flight path is monitored (lateral deviation), and the capture point is calculated. When the lateral navigation signal is captured, the lateral approach mode becomes active. The lateral approach mode then gives the commands to track the active navigation source.
The approach mode can track automatic transitions from FMS navigation to localizer approach mode. At localizer capture, the FMS navigation mode that was active becomes inactive.
The lateral approach mode arm state is set as follows:
- VOR approach arm state set when the APPR pushbutton on the FGP is pushed and VOR is the navigation source selection
- Localizer approach arm state set when the APPR pushbutton on the FGP is pushed and LOC is the navigation source selection (or preselected navigation source)
- FMS approach arm state set when the APPR pushbutton on the FGP is pushed and FMS is the navigation source selection
The lateral approach mode arm states show the annunciations that follow on the PFD:
- APPR (white)
- LNV (white)
- VOR (white)
- LOC (white)
- HDG (green) in lateral capture field.
The VOR, LOC, or back course approach capture/track state is set when the capture states occur. Also, the parameters necessary to computer guidance must be valid. These parameters include the navigation source.
When the approach mode captures, the mode is automatically cancelled by a selection of a different lateral mode or a change of the navigation source signal.
The glideslope mode is a part of the approach mode. In the approach mode, the FGC arms for a glideslope capture. The FGC does this after a front course localizer capture, if the glideslope data is correct. When the aircraft captures a glideslope, all the other vertical modes are automatically cancelled. The glideslope does not arm while the aircraft moves along a back course geometry. The glideslope capture is cancelled by a back course selection, no-approach mode, a go-around mode, or no localizer.
The lateral approach mode capture/track states show the following annunciations on the PFD:
- APPR (green)
- LNV (green)
- VOR (green)
- LOC (green)

Go-Around Mode
The go-around mode gives the commands to track a heading hold reference. The reference is set when the mode is set and cannot be adjusted. The flight director shows the go-around commands, but the autopilot can not be coupled to the guidance.
Go-Around mode is deselected upon autopilot engagement.
The go-around mode is set when the aircraft is airborne and the take-off/go-around (TO/GA) switch on the throttles is pushed. The go-around mode is immediately the active mode when set (no armed state exists). The go-around mode shows GA (green) in the lateral capture field on the PFD.
Half-Bank Mode
The half-bank mode decreases the bank limit to 15 degrees, which is almost half the usual value. Half-bank mode starts automatically when the aircraft climbs through the half-bank transition altitude (31,600 ft (9631.68 m) pressure altitude). Half-bank mode also starts automatically if the aircraft is above the half-bank transition altitude when the flight director is turned on. The half-bank mode is not a primary mode.
The half-bank mode is automatically cleared/inhibited when descending through the half bank transition altitude, by takeoff mode, by go-around mode, by onside approach capture or any onside localizer capture.
Half-bank mode is inhibited if the FMS is the active lateral mode and if the aircraft is below the half-bank transition altitude.
The 1/2 BANK pushbutton lets the flight crew cancel the automatic half-bank mode. The half-bank arc (white when armed, green when active) shows above the roll pointer on the PFD.

Back Course Mode
The back course mode captures and controls the aircraft to the on-side navigation source. The mode is set or cancelled with the B/C pushbutton. The back course mode is set and held only if a localizer is set as the navigation source. The localizer data must be valid and the back course geometry must be available for the capture to occur.
The back course mode arm is shown with two messages on the PFD. A green message in the lateral capture field shows the active sub-mode (HDG) or identifies the currently captured navigation source (LNV1, LNV2). A white message in the lateral arm field identifies the armed navigation source (B/C1 or B/C2). The back course mode capture/tracking is shown with one green message in the lateral capture field which identifies the captured navigation source (B/C1 or B/C2).
When the back course mode is captured, the mode is automatically cancelled by the selection of a different lateral mode. The mode is also automatically cancelled by a change of the navigation source signal.
Takeoff Mode
The lateral take-off mode gives a wings-level command while on the ground. After take-off, the lateral take-off mode gives a heading hold command, with a 5 degree bank limit, with the heading that existed at take-off. The heading hold memory cannot be re-synchronized. The selection of the lateral take-off mode turns on the two flight directors, disengages the autopilot (but not the yaw damper), and cancels all other lateral modes. The pilot pushes one of the throttle-mounted TO/GA switches while on the ground to set the lateral take-off mode. The lateral take-off mode is shown with a green TO in the lateral capture field on the PFD.


Vertical Modes
The AFCS has the flight guidance vertical modes that follow:
- Pitch (basic) (PTCH)
- Altitude (ALTS)
- Altitude hold (ALT)
- Vertical speed (VS)
- Flight level change (FLC)
- Vertical navigation (VNAV)
- Approach (APPR)
- Go-around (GA)
- Takeoff (TO)
Pitch Mode
The pitch mode is the basic vertical mode and is active when no other vertical modes are active and one of the two flight directors is on or the autopilot is engaged. The pitch mode gives the commands to hold a reference pitch angle.
The pilot can adjust the reference value with the VS/pitch wheel on the FGP. The reference value can be synchronized by the pilot with the AP/FD SYNC switch when the autopilot is not engaged. The reference value can be synchronized by the flight guidance when the mode is set. The reference value can be adjusted by the FMS when in the VNAV modes. The pitch reference value is limited to 20 degrees pitch up and 12 degrees pitch down.
The pitch mode shows PTCH (green) in the vertical capture field on the PFD. If VNAV is active, the pitch mode shows VPTCH (green) in the vertical capture field on the PFD. The pitch reference value does not show on the display.

Altitude Select Mode
The altitude select mode has the arm, capture, and track states. The arm state is usually set automatically while other vertical modes are active. The arm state monitors the aircraft closure rate to the target altitude and calculates the capture point. The capture state uses calculated data for a smooth low-g acquisition of the target altitude. The track state uses calculated data to hold the target altitude.
The altitude select mode has two possible target altitudes. These altitudes are the preselected altitude value or the VNAV altitude from the FMS.
The preselected altitude value is set by the pilot with the ALT button on the FGP. Preselected altitude is usually set in thousand ft increments. The ALT button is pushed to set one-hundred ft increments.
The VNAV altitude from the FMS can be the altitude target only when VNAV mode is set. The altitude select mode captures and tracks the nearest altitude that is in the direction that the aircraft descends or climbs.
When in the altitude select mode, the on-side FGC uses the barometric altitude that shows on the on-side PFD. The flight director and autopilot respond to barometric pressure setting changes when in the capture or track states.
The altitude select mode arm is automatically set on (no switch on panel) for the following events:
- Turn on flight guidance
- Set a vertical mode other than vertical approach capture or track, vertical go-around, or altitude hold
- Turn the altitude preselect button when not in altitude hold mode
The ALT button on the FGP sets the preselected altitude.
The altitude select mode arm shows ALTS (white) for preselected altitude in the vertical arm field on the PFD. If VNAV is active, the altitude select mode arm shows VALTS (white) for VNAV altitude in the vertical arm field on the PFD. The vertical arm field is blank if the preselected altitude is not armed.
The altitude select mode capture is automatically set when the altitude select mode is armed. Also, the capture states must occur and the parameters necessary to compute guidance must be valid. The altitude select mode capture is stopped while the preselect ALT button is turned. The capture does not occur if the target altitude is slewed through the current altitude.
The altitude select mode capture shows the messages that follow in the vertical capture field on the PFD:
- ALTS CAP (green) if VNAV not active and captures preselected altitude
- VALTS CAP (green) if VNAV active and captures preselected altitude
- VALTV CAP (green) if VNAV active and captures VNAV altitude
- ALTS (flashes yellow) if VNAV not active and preselected altitude capture cancelled
- VALTS (flashes yellow) if VNAV active and preselected altitude capture cancelled
- VALTV (flashes yellow) if VNAV altitude capture cancelled.
The altitude select mode track is automatically set from a valid capture when the track states occur. The altitude select mode track gives the commands necessary to hold the target altitude. The altitude select mode track shows the messages that follow in the vertical capture field on the PFD:
- ALTS (green)
- VALTS (green) if VNAV active and tracks preselected altitude
- VALTV (green) if VNAV active and tracks VNAV altitude.

Altitude Hold Mode
The altitude hold mode gives commands to capture and track the altitude hold reference. The altitude hold mode only has an active state (there is no armed state). The ALT pushbutton on the FGP starts the altitude hold mode, which holds the current pressure altitude. The altitude hold mode uses the pressure altitude reference; the flight director and autopilot do not respond to barometric pressure setting changes.
The altitude hold mode shows ALT (green) in the vertical capture field on the PFD. If VNAV is active, the altitude hold mode shows VALT (green) in the vertical capture field on the PFD. The altitude hold reference value does not show on the PFD.

Vertical Speed Mode
The vertical speed mode gives the commands to capture and track the vertical speed reference that shows on the PFD. The VS pushbutton, on the FGP, starts and stops the vertical speed mode. The vertical speed reference value is kept in the PFD and can be adjusted by the VS/pitch wheel on the FGP. The VS reference can be synchronized by the flight guidance. The VS reference can be adjusted by the FMS when in VNAV modes. The vertical speed mode only has an active state (there is no armed state).
When the vertical speed mode is turned on, the VS reference value which shows on the PFD, is set to the current vertical speed. The vertical speed mode is automatically cancelled with the selection or the automatic capture of a different vertical mode.
The vertical speed mode shows VS NNNNÎ (green) in the vertical capture field on the PFD. If VNAV is active, the vertical speed mode shows VVS NNNNÎ (green) in the vertical capture field on the PFD. The arrow gives the direction, up or down. The letters NNNN show the vertical speed reference in thousand feet per minute. When the vertical speed mode is turned on, a VS bug shows the VS reference on the VS scale.
Flight Level Change Mode
The flight level change (FLC) mode gives the commands to capture and track an IAS or Mach speed reference. It can possibly be necessary to climb or descend to the preselected altitude or VNAV altitude The flight level change mode includes this function. This is related to which altitude is active and if the aircraft can do (i.e. thrust level) the maneuver. The speed reference is held by the PFD.
The speed reference can be adjusted with the SPEED button on the FGP. The speed reference can be synchronized by the flight guidance. The speed reference can be adjusted by the FMS when in VNAV modes.
The SPEED button, on the FGP, starts or stops the flight level change mode with an IAS or Mach speed reference. Which reference starts is related to the aircraft altitude. If the aircraft is below the IAS/Mach transition altitude, the IAS reference starts. If the aircraft is above this altitude, the Mach reference starts.
The IAS/MACH pushbutton in the SPEED button changes the speed mode from IAS to Mach or from Mach to IAS. When in the IAS mode, the Mach mode automatically starts as the aircraft moves up through the transition altitude. When in the Mach mode, the IAS mode automatically starts as the aircraft moves down through the transition altitude.
When the Mach mode starts, the Mach reference, which is shown on the PFD, is set to the Mach. The Mach reference can be changed, to a value as high as maximum operating Mach (Mmo), with the SPEED button. The flight level change overspeed mode automatically starts when a large overspeed (0.015 Mach or higher than Mmo) state occurs while at an altitude higher than the IAS/Mach transition altitude. In this state, the Mach mode is not cancelled until the Mach has decreased in value from the Mmo. In all other states, the Mach mode is automatically cancelled with the selection or automatic capture of a different vertical mode.
When the IAS mode starts, the IAS reference on the PFD is set to the IAS. The IAS reference can be changed, to a value as high as maximum operating speed (Vmo), with the SPEED button. The flight level change overspeed mode automatically starts when a large overspeed (10 knots or higher than Vmo) state occurs while at an altitude lower than the IAS/Mach transition altitude. In this state, the IAS mode is not cancelled until the IAS has decreased in value from the Vmo. In all other states, the IAS mode is automatically cancelled with the selection or automatic capture of a different vertical mode.
The SPEED button operates at all times. It operates independently of the autopilot or the flight director modes. When the flight level change mode is turned on, an IAS bug shows the speed reference on the airspeed scale. When the reference is Mach, a Mach reference bug shows the IAS-equivalent Mach reference on the airspeed scale.
The flight level change mode shows FLC NNN (green) in the vertical capture field on the PFD. If VNAV is active, the flight level change mode shows VFLC NNN (green) in the vertical capture field on the PFD. The letters NNN show the airspeed reference in knots. The flight level change overspeed mode shows FLC OSPD (flashes yellow) in the vertical capture field on the PFD. If VNAV is active, the flight level change overspeed mode shows VFLC OSPD (flashes yellow) in the vertical capture field on the PFD.

Vertical Navigation Mode
The vertical navigation mode lets the FMS make a selection of the flight guidance vertical modes that follow:
- Pitch
- Vertical speed
- Flight level change
The vertical navigation mode gives commands as usual in relation to the reference value for a given mode. The pilot can manually change the automatic mode selections or reference settings made by the FMS. The VNAV pushbutton, on the FGP, sets the vertical navigation mode. The selection of VNAV is prevented if the vertical APPR capture/track mode is active with ILS as the source.
In the path mode, the FGC follows the pitch commands from the FMS. In the glidepath mode, the FGC follows the pitch commands from the FMS.
The vertical navigation mode arm states show the following annunciations on the PFD:
- PATH (white)
- FLC (white)
- ALT (white)
- VS (white)
- PITCH (white)
- GP (white)
The vertical navigation mode capture states show the following annunciations on the PFD:
- VPATH (green)
- VGP (green)
The green V shows that the FMS can give vertical mode changes. It does not show if the current vertical mode was set by the pilot or the FMS. If the FMS is invalid, then VNAV (white) with a strike-through shows in the vertical arm field on the PFD.

Approach Mode
The vertical approach mode gives commands to capture and track the vertical guidance for the ILS precision glideslope approaches. The vertical approach mode gives commands to capture and track the vertical guidancefor for FMS nonprecision glidepath approaches. The vertical approach mode operates with the lateral approach mode to track the ILS precision or FMS non-precision approaches.
The vertical approach mode has the arm and capture/track states. The vertical approach mode is armed when the mode is set. For precision approaches, the aircraft closure rate to the target flight path is monitored (vertical deviation), and the capture point is calculated. When the vertical navigation signal is captured, the vertical approach mode becomes active. The vertical approach mode then gives the commands to track the active navigation source.
Automatic capture occurs from a vertical mode. This includes FMS-sourced VNAV states. For FMS approaches the capture is forced by the FMS. The tracking is calculated by the FMS. The flight guidance uses the FMS pitch commands.
The vertical approach mode arm state is set by the following actions:
- FMS glidepath approach arm state set when the APPR pushbutton, on the FGP, is pushed. A valid FMS must be the set navigation source, VNAV is set, and the coupled FMS requests glide path (GP) arm.
The vertical approach mode arm states show the following annunciations on the PFD:
- GS (white)
- GP (white)
The glideslope approach capture state is set when the capture states occur and the parameters necessary for computer guidance are valid.
When the approach mode captures, the mode is automatically canceled by a selection of a different lateral mode or a change of the navigation source signal.
The glideslope mode is part of the approach mode. In the approach mode, the FGC arms for glideslope capture. The FGC does this after a front course localizer capture, if the glideslope data is correct. When the aircraft captures a glideslope, all the other vertical modes are automatically canceled. The glideslope does not arm while the aircraft moves along a back course geometry. The glideslope capture is canceled by a back course selection, no approach mode, go-around mode, or no localizer.
The vertical approach mode capture/track states show the annunciations that follow on the PFD:
- GS (green)
- VGP (green)

Go-Around Mode
The go-around mode gives commands to track a fixed pitch reference. The reference cannot be adjusted. The flight director shows the go-around commands, but the autopilot cannot be coupled to the guidance.
The go-around mode is set when the aircraft is airborne and the TO/GA switch on the throttles is pushed. The go-around mode is immediately the active mode when set (there is no armed state). The go-around mode shows GA (green) in the vertical capture field on the PFD.
Takeoff Mode
The vertical takeoff mode gives commands to track a fixed-pitch reference. The selection of the vertical takeoff mode turns on the two flight directors, disengages the autopilot (but not the yaw damper), and cancels all other lateral modes. The pilot pushes one of the throttle-mounted TO/GA switches while on the ground to set the vertical takeoff mode. The vertical takeoff mode is shown with a green TO in the vertical capture field on the PFD.


Aural and Visual Indications
The PFDs show the visual indications for the AFCS. The data shown on the PFDs includes:
- Flight director modes and status
- Autopilot modes and status
- Alternate and applicable source selections (attitude reference, air data reference, and DCP selection)
- AFCS monitor and status.
The flight director visual indications help the pilot manually control the aircraft. The V-bar or cross-pointer command bars show on the attitude ball. The flight director command bars on the PFD show the pilot when to turn, to move the aircraft in the up and down directions, and to maintain a stable course. The flight director visual commands include the indicators that follow:
- Course arrow and course indicator
- Flight-director cue symbol
- Lateral mode indicators
- Vertical mode indicators.
The PFDs supply visual indications for the altitude caution indication. These indications show the pilot when the aircraft gets near the preselect altitude. The indications also show if the aircraft changes from an altitude which was set and captured.
The altitude signal indications are shown on the altimeter part of the PFD at the preselect altitude digital indication, which is above the barometric tape. The indications are also shown at the preselect bugs. The caution indication symbols are double bars across the fine and coarse altitude tapes.
The preselect digital indications and bugs change state and color as follows:
- At the altitude caution indication threshold, which is approximately 1000 ft (304.8 m) from the set altitude, a 1-second C-chord sounds, and the indication and bugs flash for approximately 5 seconds in magenta and then stay on. Pilot can cancel the caution indication.
- When the aircraft is within 200 ft (60.96 m) of the set altitude,the 1-second C-chord sounds and the indication and bugs come on steady in magenta. This shows altitude capture.
- After the preselect altitude is captured, if the aircraft deviates more than 200 ft (60.96 m) above or below the captured altitude, the indication and the altitude bug flash in yellow until the aircraft returns to < 200 ft (60.96 m) from the preselect altitude or the pilot cancels the alert. The 1-second C-chord sound is also heard. A second aural tone sounds if the aircraft altitude is >1000 ft (304.8 m) from the captured altitude.
If the autopilot is engaged during a takeoff configuration (the aircraft is on the ground and the two engines are at near takeoff thrust), there is an aural warning and a visual warning on the engine indicating and crew alerting system (EICAS). Also, the two WARNING portions of the master warning/caution switch/lights flash. The aural warning is a voice which speaks the word CONFIGURATION. The EICAS indication is CONFIG AUTOPILOT
The WARNING part of the master warning/caution switch/lights flashes red when a new CAS warning message is shown.
Messages Display
The pilot MFD shows the CAS messages. The CAS messages display the unserviceable condition indications for the AFCS.
The CONFIG AUTOPILOT warning message shows when the autopilot is engaged and the aircraft is in takeoff configuration.
The AFCS MESSAGES FAIL caution message shows when the AFCS has lost the function to show messages.
The AP HOLDING LWD caution message shows when the autopilot holds a left wing down control force.
The AP HOLDING NOSE DOWN caution message shows when the autopilot holds a nosedown control force.
The AP HOLDING NOSE UP caution message shows when the autopilot holds a noseup control force.
The AP HOLDING RWD caution message shows when the autopilot holds a right wing down control force.
The AP STAB TRIM FAIL caution message shows when the autopilot cannot make a trim correction to the horizontal stabilizer.
The FD MODE CHANGE caution message shows when an inadvertent FD mode change has occurred.
The YAW DAMPER FAIL caution message shows when the yaw damper has failed.
The FD 1 FAIL advisory message shows when flight director No. 1 has failed.
The FD 2 FAIL advisory message shows when flight director No. 2 has failed.
The YAW DAMPER OFF status message shows when the yaw damper is not engaged (yaw damper set off).
| EICAS MESSAGE(S) | LEVEL (COLOR) |
|---|---|
| CONFIG AUTOPILOT | WARNING (red) |
| AFCS MESSAGES FAIL | CAUTION (amber) |
| AP HOLDING LWD | CAUTION (amber) |
| AP HOLDING NOSE DOWN | CAUTION (amber) |
| AP HOLDING NOSE UP | CAUTION (amber) |
| AP HOLDING RWD | CAUTION (amber) |
| AP STAB TRIM FAIL | CAUTION (amber) |
| FD MODE CHANGE | CAUTION (amber) |
| YAW DAMPER FAIL | CAUTION (amber) |
| FD 1 FAIL | ADVISORY (cyan) |
| FD 2 FAIL | ADVISORY (cyan) |
| YAW DAMPER OFF | STATUS (white) |

Defective conditions that occur in the IAPS can have an effect on the AFCS. If there is an overheat condition, the IAPS monitor circuits stop the FGC operation.
The FGC on the pilot side (FGC No. 1) stops operation if there is an overheat condition on the left side of the IAPS. The FGC on the copilot side (FGC No. 2) stops operation if there is an overheat condition on the right side.
Autopilot/Flight Director Synchronization
Autopilot Synchronization Selection
When the autopilot is engaged, the AP/FD SYNC switch operation releases the aileron and elevator servo clutches so the aircraft can be flown manually. This condition (in which the autopilot stays engaged but the servo clutches are disconnected) is AP SYNC. When the AP/FD SYNC switch is pushed, the onside flight director is synchronized to the aircraft vertical and lateral references. The clutches stay released while the AP/FD SYNC switch is pushed. When the AP/FD SYNC switch is released, the FGC smoothly takes back command of the autopilot. Manual pitch trim will not disengage the autopilot during AP SYNC.
Flight Director Synchronization Selection
When the autopilot is not engaged and when the AP/FD SYNC switch is pushed, the on-side flight director is synchronized to the aircraft vertical and lateral references at the present time. This is the FD SYNC function. When the switch is pushed and held, a yellow SYNC annunciation is shown in the attitude ball. The message will stay for three seconds or until the switch is released. The flight director AP/FD SYNC switch operates only when the autopilot is not engaged. The flight director de-synchronization will have no effect when the autopilot is engaged.
FD SYNC operates for those modes that have the references that follow:
- Roll
- Pitch
- Altitude hold
- Vertical speed
- Flight level change (FLC).
The AP/FD SYNC switch operates continuously while it is pushed, and the last value is kept when the switch is released.
The FD SYNC is set when the on-side FD SYNC switch is pushed, while there are the conditions that follow:
- A lateral or vertical mode is on that has a reference that can be synchronized
- The on-side flight director is on.
The FD SYNC is set when the off-side AP/FD SYNC switch is pushed, while there are the conditions that follow:
- A lateral or vertical mode is on that has a reference that can be synchronized
- The off-side flight director is on.
If the lateral mode is roll heading-hold, the heading hold reference is aligned to the aircraft heading while FD SYNC is set. Its value is kept when FD SYNC is no longer set.
If the lateral mode is roll bank-hold, the roll hold reference is synchronized to the aircraft roll angle (until the bank limit) while FD SYNC is set. Its value is kept when FD SYNC is no longer set.
If the vertical mode is pitch hold, the pitch hold reference is synchronized to the aircraft pitch angle (until the pitch limits) while FD SYNC is set. Its value is kept when FD SYNC is no longer set.
If the vertical mode is altitude hold, the altitude hold reference will be aligned to the pressure altitude while FD SYNC is set. Its value is kept when FD SYNC is no longer set.
If the vertical mode is vertical-speed-hold, flight guidance causes the PFD to synchronize the vertical speed reference to the vertical speed (until the VS reference limits) while FD SYNC is set. Its value is kept when FD SYNC is no longer set.
If the vertical mode is flight-level-change, the flight guidance system causes the PFD IAS or Mach speed reference to be synchronized to the IAS or Mach speed. The speed reference limits are its maximum synchronized speeds while FD SYNC is set. Its value is kept when FD SYNC is no longer set. The FD SYNC does not have an effect on the FLC overspeed, altitude preselect mode, and vertical approach mode.
In go-around mode and take-off mode the sync switch automatically sets the roll and pitch hold modes. The roll and pitch references are set to the current aircraft roll and pitch attitudes.
If the FGP XFR pushbutton is set to the left, the references are set to the conditions the left sensors measure. If the FGP XFR pushbutton is set to the right, the references are set to the conditions the right sensors measure.
While the FD sync is set, the SYNC annunciation shows on the PFD. The SYNC annunciation shows for a minimum of three seconds.
AFCS Diagnostics
The FGC supplies the diagnostics to help with the AFCS fault isolation. The pushbuttons and the joystick on the cursor control panel (CCP) control the diagnostic functions. The copilot side multifunction display (MFD) shows a visual display of the diagnostic data. The A/ICE, ECS, and FLT pushbuttons on the CCP, when pushed at the same time, show the REPORT MODE on the copilot MFD. There are two other diagnostic modes, the INPUT MODE and the OUTPUT MODE. Pressing the same three pushbuttons again, selecting one format mode (FRMT), or pressing the checklist (CKLST) pushbutton exit the FGC diagnostic mode.
The FGC diagnostics isolate unserviceable conditions in the flight control system. These diagnostics are used if an autopilot or flight director problem cannot be isolated with the CURRENT FAULTS page. The FGCs, not the maintenance diagnostic computer (MDC), control the FGC diagnostics. The FGC diagnostics have three basic modes. The input mode shows inputs to the FGCs. The report mode shows internal monitor data from the FGC. The output mode shows and controls set FGC outputs.
One of the two FGCs can be in diagnostic mode. The FGC that is in diagnostic mode controls the MFD display. When the two FGCs are in diagnostic mode, the XFR pushbutton on the FGP sets which FGC sends display data to the MFD. A blue arrow on the diagnostic page shows the FGC (left or right) that is controlling the display.
The FGCs do not store diagnostics in nonvolatile memory. The FGCs begin to record data at power-up and retain this data only while the FGC is energized. When the aircraft is not powered, all stored data is erased. Before aircraft power is removed, data must be recorded.
Some FGC diagnostic codes are sent to the MDC and recorded in nonvolatile memory. The FGC sends the codes that follow to the MDC:
- Repair code - there was a non-zero repair code when weight on wheels occurred
- AP engage code - a try to engage the autopilot failed
- AP disengage code - an incorrect autopilot disengage occurred
- YD engage code - a try to engage the yaw damper failed
- YD disengage code - an incorrect yaw damper disengage occurred.
The MDC records the diagnostic codes in nonvolatile memory. This is so the codes can be used after the aircraft is de-energized. The FGC diagnostic codes recorded during flight are available for display on the LRU fault history page. This display gives historical data on fault sequences from several flight legs. The number of FGC diagnostic codes recorded in flight is related to the number of LRU faults the MDC can record during a flight. It is also related to the number of faults already recorded when the diagnostic codes are sent.
The report mode gives a report on what the FGCs monitor. Three mode select pushbuttons, pushed at the same time, exit the FGC diagnostics.
Autothrottle (A/C 20875 to 20936 post SB350-22-002, and A/C 20937 and Subs)
The autothrottle (AT) controls engine thrust by sending commands to a dual servo motor clutch pack (SMCP) that drives the thrust levers between IDLE and the TO detent.
The AT is available during all phases of flight and operates with or without the AP and/or FD. The active vertical Flight Director (FD) mode determines the AT modes. The AT controls engine thrust to follow the airspeed bug, either cyan (manual) or magenta (VNAV PLAN SPD), or to maintain a fixed thrust setting corresponding to the TO (takeoff) detent, CLB (climb) detent, or IDLE thrust lever position.
The AT computer receives inputs from:
- The engine FADECs
- The avionics systems via the input/output concentrators (IOC)
- The proximity sensor electronics unit (PSEU)
An advisory placard is located just ahead of the pedestal on either side of airplanes with the AT system installed.
The AT system has the following components:
- A single autothrottle computer in the right avionics rack
- A dual servo motor clutch pack (SMCP) in the pedestal below the throttle quadrant assembly (TQA)
- Controls located on the thrust levers
- AT modes and engagement status indications on the flight mode annunciator (FMA)
- A test function on the SYSTEM TEST panel
A dedicated AUTO THROTTLE circuit breaker (CB) on the right CB panel in the cockpit supplies power to the AT system from the R MAIN BUS.
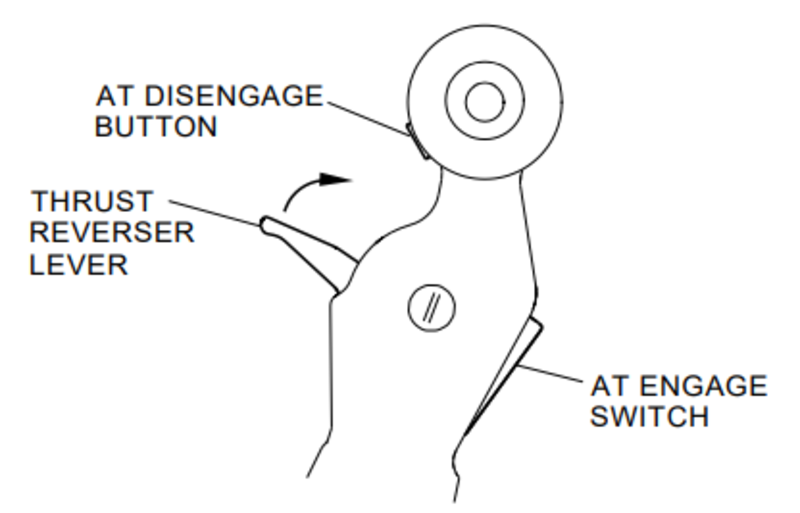
Autothrottle Controls
AT ENGAGE switches are located on the aft side of the thrust levers. AT DISENGAGE buttons are located on the forward side of the thrust lever.
Autothrottle Indications
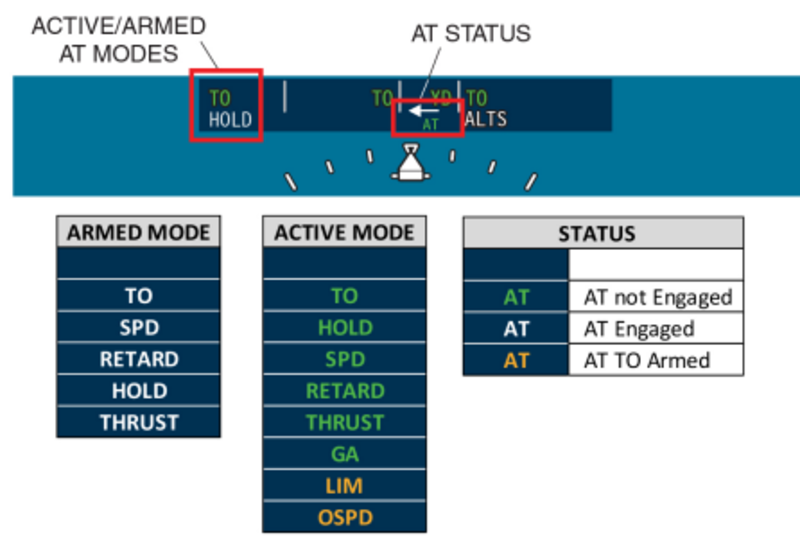
The left side of the flight mode annunciator (FMA) shows the AT modes. The active mode is on the top row and can be either green or amber. The armed mode is on the bottom row in white. The AT engagement status shows in the center of the FMA in green, white or amber. The AT mode indications flash for five seconds following an AT mode change.
Input Selection
The AT system receives FD data from the active flight guidance computer (FGC) as indicated by the left/right arrow above the AT status.

Refer to 22-30-00 for more information.
12/30/15
System Interface
The System Interface includes
- Air Data Computer
- Inertial Reference Unit
- Data Concentrator Unit
- IOC
- FGP
- FGC
- Servos
- Pitch Trim
- Yaw Damper
- Throttle Quadrant
- Flight Management System
- VHF Navigation System
- Attitude and Heading Reference System
- Electronic Flight-Instrument System (EFIS)
- Warning/Caution Control System
- Engine Indicating and Crew Alerting System
- Integrated-Avionics Processor System (IAPS)
Air Data Computer
The air data computer (ADC) No. 1 sends the airspeed, altitude, and vertical speed parameters on the ARINC 429 low-speed data bus (L-ADC-1) to the input/output concentrator (IOC) No. 1. The ADC No. 2 sends the airspeed, altitude, and vertical speed parameters on the ARINC 429 low-speed data bus (R-ADC-1) to the IOC No. 2.
Inertial Reference Unit
The inertial reference unit (IRU) No. 1 sends the pitch, roll, and yaw parameters on the ARINC 429 high-speed data bus (L-IRS-1) to the IOC No. 1 and the FGC No. 1. The IRU No. 2 sends pitch, roll, and yaw parameters on the ARINC 429 high-speed data bus (R-IRS-1) to the IOC No. 2 and the FGC No. 2.
Data Concentrator Unit
The data concentrator units (DCUs) sends the ELEV POSITION IN and AIL POSITION IN analog signals to the FGCs. The FGCs monitor the position of the control surfaces.
IOC
Each FGC transmits and receives data through the IOCs installed in the IAPS. There are two IOCs, one in each half of the IAPS. The IOC No. 1 sends data on the ARINC 429 high-speed data bus (L-IOC-3) to the FGC No. 1. The IOC No. 2 sends data on the ARINC 429 high-speed data bus (R-IOC-3) to the FGC No. 2.
The IOCs transmit the following data:
- Air data parameters
- Reference data from electronic flight instrument system (EFIS)
- Horizontal stabilizer trim electronic control unit (HST ECU) trim data
- Lateral deviation
- Vertical deviation
- Radio altitude
The FGC No. 1 sends data on the ARINC 429 high-speed data bus (L-FGC-1) to the IOC No. 1. The FGC No. 2 sends data on the ARINC 429 high-speed data bus (R-FGC-1) to the IOC No. 2.
The FGCs transmit the following data:
- Reference air data parameters
- Roll outputs (FGC to IOC)
- Pitch outputs (FGC to IOC)
- FGC mode words
- Pitch, roll, and yaw mistrim
- Roll servo command
- Yaw servo command
- Pitch servo command
- FGC trim command
- FGC diagnostic words
- FGC remote text
FGP
The FGC No. 1 sends the FGC mode data on the RS422 data bus (L-FGC-2) to the FGP. The FGC No. 2 sends the FGC mode data on the RS422 data bus (R-FGC-2) to the FGP.
The FGC No. 1 receives the data from channel A of the FGP on the RS422 data bus (FGP-1) from the FGP. The FGC No. 2 receives the data from channel B of the FGP on the RS422 data bus (FGP-2) from the FGP.
The FGP-1 and FGP-2 data busses have the data that follows:
- Front panel pushbuttons
- VS/pitch wheel direction/counter
- AP monitor feedback
- AP clutch feedback
- Disengage inputs
- AP/YD DISC bar position
- Remote switch data
The FGC has servo and internal-processor monitors. When the monitors show correct operation, the FGC sends a 28 VDC AP ENGAGE ENABLE discrete signal to the FGP. The FGC No. 1 sends the AP ENGAGE ENABLE A OUT signal to the FGP. The FGC No. 2 sends the AP ENGAGE ENABLE B OUT signal to the FGP. The AP ENGAGE ENABLE signals have to be valid (28 VDC) before the FGP can engage the autopilot.
FGC
Each FGC receives data from the other FGC. The FGC No. 1 sends data on the ARINC 429 high-speed data bus (L-FGC-3) to the FGC No. 2. The FGC No. 2 sends data on the ARINC 429 high-speed data bus (R-FGC-3) to the FGC No. 1.
Servos
When the flight director is on, the FGCs output the servo drive signals and the servo motors turn, but they are not connected to the control surfaces. When the autopilot is engaged, the FGP outputs the 28 VDC ELEV CLUTCH ENGAGE OUT signal to the elevator servo and 28 VDC AIL CLUTCH ENGAGE OUT signal to the aileron servo and the DCU. The clutch engage signals connect the servo motor mechanical outputs to move the control surfaces.
The AFCS has a two-axis autopilot that sends drive signals to the elevator and aileron servos. The FGCs make identical calculations to operate each servo motor. The FGCs each send a 14 VDC bias signal to the servo motor. Because the two motor terminals are biased at 14 VDC, there is no motor current. When the computers send a servo command, the drive signals are equal in amplitude, but have opposite polarity. The voltage difference at the motor terminals causes the motor to operate.
The FGC No. 1 sends the ELEV SERVO MOTOR A OUT drive signal to the elevator servo. The FGC No. 2 sends the ELEV SERVO MOTOR B OUT drive signal to the elevator servo.
The FGC No. 1 sends the AIL SERVO MOTOR A OUT drive signal to the aileron servo. The FGC No. 2 sends the AIL SERVO MOTOR B OUT drive signal to the aileron servo.
Each servo has two rate generators that send motor speed feedback to the FGCs. The elevator servo sends the ELEV SERVO TACH (A or B) IN feedback signal to the FGC (No. 1 and No 2 respectively). The aileron servo sends the AIL SERVO TACH A IN feedback signal to the FGC No. 1. The aileron servo sends the AIL SERVO TACH B IN feedback signal to the FGC No. 2.
Pitch Trim
The pitch trim system sends the HST ECU trim status, HST ECU stabilizer rate and direction, and HST ECU stabilizer position on the ARINC 429 high-speed data bus (HST ECU-1) to the IOC No. 1. The pitch trim system sends the HST ECU trim status, HST ECU stabilizer rate and direction, and HST ECU stabilizer position on the ARINC 429 high-speed data bus (HST ECU-2) to the IOC No. 2. The HST ECU-1 and HST ECU-2 data busses send pitch trim feedback to the FGCs.
The FGCs output the FGC-trim-command data-words to the pitch trim system. For a nose-down attitude the FGC No. 1 sends the TRIM UP ARM signal and the FGC No. 2 sends the TRIM UP CMD signal. For a nose-up attitude the FGC No. 1 sends the TRIM DN CMD signal and the FGC No. 2 sends the TRIM DN ARM signal.
The FGC No. 1 sends data on the ARINC 429 high-speed data bus (L-FGC-1) to the IOC No. 1. The IOC No. 1 sends data on the ARINC 429 data bus L-GPBUS-5 to the pitch trim system. The FGC No. 2 sends data on the ARINC 429 high-speed data bus (R-FGC 1) to the IOC No. 2. The IOC No. 2 sends data on the ARINC 429 data bus R-GPBUS-5 to the pitch trim system.
The pitch trim system sends the NORMAL TRIM AVAIL A IN discrete signal to the FGC No. 1. The pitch trim system sends the NORMAL TRIM AVAIL B IN discrete signal to the FGC No. 2.
The FGC No. 1 sends the AP TRIM ENABLE A OUT discrete signal to the pitch trim system. The FGC No. 2 sends the AP TRIM ENABLE B OUT discrete signal to the pitch trim system.

System Monitoring
The FGC has a hardware energize function which does the operations that follow when the computer is energized:
- The two processors in the FGC are started again
- The random access memory (RAM) memory is erased
- The interrupt vectors for the processors are set
- The programmable hardware timers are put in
- The serial input/output data registers are put in
- The interrupts are turned on and the processors start their background tasks
- A test is done on the monitor circuits
- A test is done on the servo commands.
The autopilot cannot be engaged until the power-up tests are complete with no failures. The FGC continuously monitors the AFCS operation, in addition to its power-up test. These continuous tests include:
- Read only memory (ROM) checksum
- RAM write-read
- Pitch, roll, and yaw servo command wraparound
- Too high of an attitude/altitude rate
- Serial input/output wraparound through the cross channel and panel buses
- Autopilot disengage
- Yaw damper disengage.
The autopilot automatically disengages when the FGC finds a failure condition. Engagement of the autopilot is also prevented when the FGC finds a failure condition. The yaw damper function does this also. A failure condition is two problems of the same type, one after the other, detected by the autopilot or the yaw damper monitor circuits.
The pitch trim monitor function is completed before and after the autopilot engages. If a pitch trim failure is sensed before the autopilot engages, then the autopilot does not engage. If a pitch trim failure is sensed after the autopilot engages, then the automatic pitch trim function stops. However, the autopilot function continues to operate. If the FGC finds a failure in the data it receives from its usual IOC, it automatically changes to the second IOC as its data source.
The other components of the AFCS do not have power-up tests or self-monitor functions. The FGC supplies this function for the system.
10/13/20
Component Location Index
| Component Location Index | |||
|---|---|---|---|
| IDENT | DESCRIPTION | LOCATION | IPC REF |
| - | FLIGHT GUIDANCE COMPUTER (FGC) | ZONE(S) 222 | 22-11-01 |
| PL9 | FLIGHT GUIDANCE PANEL (FGP) | ZONE(S) 211 | 22-11-05 |
| - | AILERON SERVO MOUNT | ZONE(S) 182 | 22-11-09 |
| - | ELEVATOR SERVO MOUNT | ZONE(S) 330 | 22-11-13 |
| A126 | AILERON SERVO | ZONE(S) 182 | 22-11-17 |
| A125 | ELEVATOR SERVO | ZONE(S) 330 | 22-11-21 |
| S95 | AUTOPILOT/FLIGHT DIRECTOR (AP/FD) SYNC SWITCH | ZONE(S) 211 | 22-11-29 |
| S96 | AUTOPILOT/FLIGHT DIRECTOR (AP/FD) SYNC SWITCH | ZONE(S) 212 | 22-11-29 |