

07/19/19
Message Overview:
Fault Message:
FMQGC DOUBLE ARINC CH.B INTERFACE FAULT
Fault Code:
2844689PK
Associated CAS:
| Reporting LRU: | Fuel Management and Quantity Gauging Computer (FMQGC) |
| System Description: | 28-41-00 |
| Schematic Diagram: | 28-41-00 [ Global Express ] [ G5000 ] [ Global XRS ] |
| Wiring Diagram: | 31-42-06 [ Global Express ] [ G5000 ] [ Global XRS ] |
Fault Description:
Dual ARINC inputs failure from Data Acquisition Unit (DAU) 2 Channel A and Channel B to Fuel Management and Quantity Gauging Computer (FMQGC) Channel B.
Possible Causes:
- Data Acquisition Unit (DAU) 2 (A18)
- Junction Box (JB4)
- Fuel Management and Quantity Gauging Computer (FMQGC) (A47)
- Associated Wiring
Troubleshooting Tips:
Advisory Wire/Service Bulletin: None
Forum Articles/Infoservice/Newsletter: None
- If FMQGC DOUBLE ARINC INTERFACE FAULT (external fault) is reported in CAIMS and no FMQGS COMPUTER/WRG FAULT (FMQGC Internal Fault) is reported, then the failure is external to the FMQGC. DAU1, DAU2 or the ARINC input wiring is the most probable cause of the failure.
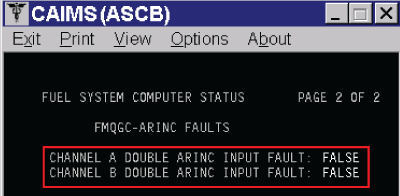
- FMQGC internal faults can be checked using CAIMS as follows:
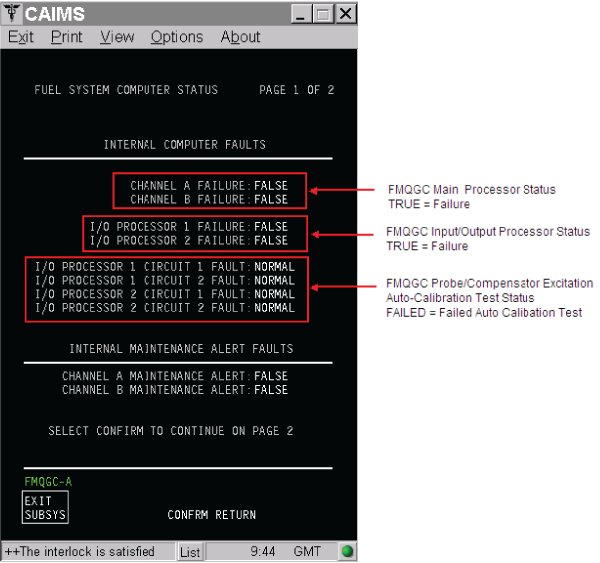
NOTE: These FMQGC internal faults will trigger the FMQGS COMPUTER/WRG FAULT message in CAIMS - CAIMS – FMQGC External ARINC Failure Status
- FMQGC re-racking procedure
- The FMQGC pins and mounting tray receptacle have minimal engagement tolerance. Furthermore, the special coaxial pins/sockets used for the fuel probe excitation circuit require additional force to fully engage them. Proper installation and racking of the FMQGC is vital to the operation of the fuel system
- Install the FMQGC in its mounting tray as follows:
- Slide the FMQGC straight into the mounting tray until connectors engage
- Engage the mounting tray turn buckles onto the front of the FMQGC
- Screw in the turn buckles until the tension increase
- Placing both hands on the front of the computer, push the FMQGC into the mounting tray
- Repeat Step c and d several times until the turn buckles are tight and the FMQGC connectors are fully engaged
Quick Links:
| Removal of the Junction Box JB4 | AMM 24-00-05-000-801 [ Global Express ] [ G5000 ] [ Global XRS ] |
| Installation of the Junction Box JB4 | AMM 24-00-05-400-801 [ Global Express ] [ G5000 ] [ Global XRS ] |
| Removal of the Junction Box JB4 Circuit-Cards | AMM 24-00-06-000-801 [ Global Express ] [ G5000 ] [ Global XRS ] |
| Installation of the Junction Box JB4 Circuit-Cards | AMM 24-00-06-400-801 [ Global Express ] [ G5000 ] [ Global XRS ] |
| Removal of the Computer | AMM 28-41-01-000-801 [ Global Express ] [ G5000 ] [ Global XRS ] |
| Installation of the Computer | AMM 28-41-01-400-801 [ Global Express ] [ G5000 ] [ Global XRS ] |
| Removal of the Data Acquisition Units (DAU) | AMM 31-42-01-000-801 [ Global Express ] [ G5000 ] [ Global XRS ] |
| Installation of the Data Acquisition Units (DAU) | AMM 31-42-01-400-801 [ Global Express ] [ G5000 ] [ Global XRS ] |
| Access to System Diagnostics | AMM 45-45-00-970-804 [ Global Express ] [ G5000 ] [ Global XRS ] |
| Wire Repair - Maintenance Practices - ALL | SPM 20-12-10-02 [ Global Express ] [ G5000 ] [ Global XRS ] |
Troubleshooting Recommendations:
- Swap DAU 2 with DAU 1.
- If system checks are good, replace DAU 2 and do close out.
- If fault remains, continue with next step.
- Perform wiring checks between JB4/PCB2, DAU 2 (A18CP1) and FMQGC (A47EP1).
NOTE: via TP-1,TP-32,TP-63,TP-64 for 93 Pin Testpoint Connector and via TP-1,TP-33,TP-65,TP-66 for 96 Pin Testpoint Connector.- If wiring checks are not good, repair defective wiring as required and do close out.
- If wiring checks are good, continue with next step.
- Re-rack the FMQGC.
- If system checks are good, do close out.
- If fault remains, continue with next step.
- Reset FMQGC power.
- If system checks are good, do close out.
- If fault remains, continue with next step.
- Replace FMQGC.
- Do close out.
