

11/06/25
Message Overview:
Message Name:
SLOW OXYGEN LEAK
| Message Code: | 351OBS004 |
| Effectivity: | All |
| System: | Oxygen System |
| System Description: | 35-00-00 - Oxygen |
| Schematic Diagram: | [ G5000 ] [ Global Express ] [ Global XRS ] SSM 35-11-00-101 - Oxygen System - Electrical Schematic [ G5000 ] [ Global Express ] [ Global XRS ] SSM 35-11-00-102 - Oxygen System - Electrical Schematic [ G5000 ] [ Global Express ] [ Global XRS ] SSM 35-11-00-102 - Oxygen System - Electrical Schematic |
| Wiring Diagram: | [ G5000 ] [ Global Express ] [ Global XRS ] WM 35-11-00-1_001 - Sheet 1 - Crew Oxygen Masks - ALL [ G5000 ] [ Global Express ] [ Global XRS ] WM 35-12-00-1_001 - Sheet 1 - Oxygen System - [9002-9126] [ G5000 ] [ Global Express ] [ Global XRS ] WM 35-12-01-1_001 - Sheet 1 - Oxygen System - ALL [ G5000 ] [ Global Express ] [ Global XRS ] WM 35-21-00-1_001 - Sheet 1 - Oxygen Indication - [9140-9158] [ G5000 ] [ Global Express ] [ Global XRS ] WM 35-21-01-1_001 - Sheet 1 - Passenger Oxygen Control Panel (AP36) - ALL |
Message Description:
Troubleshooting slow Oxygen Leaks.
Possible Causes:
- Oxygen Cylinder Regulator Assembly
- High Pressure Fill Line Check Valve (installed on regulator)
- High Pressure Capillary Line
- Pressure Transducer (MT132)
- Oxygen Servicing Panel Pressure Gauge
- High Pressure Filling Line
- Oxygen Filler Valve
- High Pressure Relief Vent Line
- Low Pressure Relief Vent Line
- Low Pressure Supply Line
- Low Pressure Supply Line Check Valve
- Pressure Switch (S48)
- Pressure Switch (S49)
- Pressure Switch (S50)
- Pressure Switch (S51)
- Crew Oxygen Mask (A193)
- Crew Oxygen Mask (A194)
- Oxygen Mask Stowage Box
- Passenger Oxygen Control Panel (AP36)
- Associated Fittings (Tee, Union, Bulkhead)
Troubleshooting Tips:
Advisory Wire/Service Bulletin:
- AW700-35-0952 - Oxygen Cylinder Low Pressure Relief Valve
Full Throttle Blog/Forum Articles/Infoservice/Newsletter:
- RIL GX-0084 - Optional Leak Test of the Oxygen System Using Helium
- RIL GX-0089 - Optional Leak Test of the Oxygen System Using tracer gas mixture 5% Hydrogen 95% Nitrogen
- RIL GX-0517 - Oxygen Leak Test Kit GSE 35X-00-04 instructions
- Oxygen Control Panel alternate leak check procedure
- Tech Corner Article - Troubleshooting Tips for Oxygen Leaks
Flight Operation Notifications Manual (FONM): None
NOTES:
- The RILs can also be found on the Bombardier Customer Portal, under Technical Library, Engineering and Service documents
- Numerous pieces of GSE associated with the Oxygen system are listed in the Illustrated Tool and Equipment Manual (ITEM). Links are provided in the Quick Links: element of this Observed Fault.
- As you start the troubleshooting be aware there may be one or many leaks. It may help to isolate sections of the oxygen system to find leaks.
- It will be helpful to find out if any maintenance has recently been accomplished on the oxygen system and did the leak start after the maintenance event. Informed with what work was accomplished previously and if any components were replaced may be an area to focus the troubleshooting.
- If possible, Interrogate the flight operations team to understand if the reported oxygen leak occurs while the aircraft is on the ground or only happens while the aircraft is in flight and what duration are the flights when the oxygen quantity is observed to be declining. Oxygen leaks observed during long duration flights could be an indication of a leak induced by cold soaked components.
- A new GSE is being introduced for the Oxygen system. The GSE is G700-350004-1 O2 Leak Test Kit.
Quick Links:
| Grounding of the Aircraft | [ G5000 ] [ Global Express ] [ Global XRS ] AMM10-11-00-867-801 |
| Removal of the Covers and Plugs | [ G5000 ] [ Global Express ] [ Global XRS ] AMM10-12-00-020-801 |
| Installation of the Covers and Plugs | [ G5000 ] [ Global Express ] [ Global XRS ] AMM10-12-00-420-801 |
| Standard Aircraft Configuration for Maintenance | [ G5000 ] [ Global Express ] [ Global XRS ] AMM12-00-00-867-801 |
| Aircraft Walkaround (for Maintenance) | [ G5000 ] [ Global Express ] [ Global XRS ] AMM12-00-00-867-802 |
| Servicing of the Flight-Crew Oxygen System | [ G5000 ] [ Global Express ] [ Global XRS ] AMM12-13-01-614-801 |
| Connect Electrical Power to the Aircraft | [ G5000 ] [ Global Express ] [ Global XRS ] AMM24-00-00-861-801 |
| Remove the Electrical Power from the Aircraft | [ G5000 ] [ Global Express ] [ Global XRS ] AMM24-00-00-861-802 |
| Electrical/Electronic Safety Precautions | [ G5000 ] [ Global Express ] [ Global XRS ] AMM24-00-00-910-801 |
| Electrostatic Discharge Safety Precautions | [ G5000 ] [ Global Express ] [ Global XRS ] AMM24-00-00-910-802 |
| Oxygen System Safety Precautions | [ G5000 ] [ Global Express ] [ Global XRS ] AMM35-00-00-910-801 |
| Removal of the Oxygen Supply Tubes | [ G5000 ] [ Global Express ] [ Global XRS ] AMM35-10-00-000-801 |
| Installation of the Oxygen Supply Tubes | [ G5000 ] [ Global Express ] [ Global XRS ] AMM35-10-00-400-801 |
| Removal of the Low Pressure/High Pressure Discharge System Tubes | [ G5000 ] [ Global Express ] [ Global XRS ] AMM35-10-00-000-802 |
| Installation of the Low Pressure/High Pressure Discharge System Tubes | [ G5000 ] [ Global Express ] [ Global XRS ] AMM35-10-00-400-802 |
| Leak Test of the Crew Oxygen System | [ G5000 ] [ Global Express ] [ Global XRS ] AMM35-10-00-790-801 |
| Removal of the Oxygen Storage Cylinder and the Regulator | [ G5000 ] [ Global Express ] [ Global XRS ] AMM35-11-01-000-801 |
| Installation of the Oxygen Storage Cylinder and the Regulator | [ G5000 ] [ Global Express ] [ Global XRS ] AMM35-11-01-400-801 |
| Leak Test of the Oxygen Storage Cylinder and the Regulator | [ G5000 ] [ Global Express ] [ Global XRS ] AMM35-11-01-790-801 |
| Removal of the Oxygen Mask Stowage-Boxes | [ G5000 ] [ Global Express ] [ Global XRS ] AMM35-11-09-000-801 |
| Installation of the Oxygen Mask Stowage-Boxes | [ G5000 ] [ Global Express ] [ Global XRS ] AMM35-11-09-400-801 |
| Leak Test of the Oxygen Mask Stowage-Boxes | [ G5000 ] [ Global Express ] [ Global XRS ] AMM35-11-09-790-801 |
| Disconnect the Capillary Lines from the Oxygen Pressure Regulators | [ G5000 ] [ Global Express ] [ Global XRS ] AMM35-12-00-020-801 |
| Connect the Capillary Lines to the Oxygen Pressure Regulators | [ G5000 ] [ Global Express ] [ Global XRS ] AMM35-12-00-420-801 |
| Leak Test of the Oxygen Ground-Servicing-Panel Pressure-Gauge | [ G5000 ] [ Global Express ] [ Global XRS ] AMM35-12-01-790-801 |
| Leak Test of the Oxygen Filler Valve | [ G5000 ] [ Global Express ] [ Global XRS ] AMM35-12-05-790-801 |
| Leak Test of the Oxygen Pressure Transducer | [ G5000 ] [ Global Express ] [ Global XRS ] AMM35-12-09-790-801 |
| Leak Test of the Oxygen Check Valve | [ G5000 ] [ Global Express ] [ Global XRS ] AMM35-12-13-790-801 |
| Leak Test of the Oxygen Pressure Switch | [ G5000 ] [ Global Express ] [ Global XRS ] AMM35-12-17-790-801 |
| Leak Test of the Therapeutic Oxygen Valve | [ G5000 ] [ Global Express ] [ Global XRS ] AMM35-20-05-790-801 |
| Removal of the PASSENGER OXYGEN Control-Panel | [ G5000 ] [ Global Express ] [ Global XRS ] AMM35-21-01-000-801 |
| Installation of the PASSENGER OXYGEN Control-Panel | [ G5000 ] [ Global Express ] [ Global XRS ] AMM35-21-01-400-801 |
| Leak Test of the PASSENGER OXYGEN Control Panel | [ G5000 ] [ Global Express ] [ Global XRS ] AMM35-21-01-790-801 |
| Removal of the Forward Equipment-Compartment Access-Panels (131AL/132AR) | [ G5000 ] [ Global Express ] [ Global XRS ] AMM52-45-05-000-801 |
| Installation of the Forward Equipment-Compartment Access Panels (131AL/132AR) | [ G5000 ] [ Global Express ] [ Global XRS ] AMM52-45-05-400-801 |
| Access to Active Faults | [ G5000 ] [ Global Express ] [ Global XRS ] AMM45-45-00-970-802 |
| Access to Stored Faults | [ G5000 ] [ Global Express ] [ Global XRS ] AMM45-45-00-970-803 |
| Access to System Diagnostics | [ G5000 ] [ Global Express ] [ Global XRS ] AMM45-45-00-970-804 |
| Flight Deck Effect to Fault Correlations | [ G5000 ] [ Global Express ] [ Global XRS ] AMM45-45-00-970-821 |
| 35X-00-01 - KIT - 02 BOTTLE PRESSURE CHECK | [ G5000 ] [ Global Express ] [ Global XRS ] G700-350001-1 |
| 35X-00-02 - Passenger Oxygen Panel Adapter | [ G5000 ] [ Global Express] [ Global XRS ] G700-350002-1 |
| 35X-00-03 - KIT - CAPILLARY LINE VISE GRIP | [ G5000 ] [ Global Express ] [ Global XRS ] G700-350003-1 |
| 35X-00-04 - KIT-OXYGEN LEAK DETECTION - G700-350004-1 | [ G5000 ] [ Global Express ] [ Global XRS ] G700-350004-1 |
| 35X-10-01 - Test Kit - Crew Oxygen System | [ G5000 ] [ Global Express ] [ Global XRS ] G700-351001-29 |
| 35X-12-01 - Shield - Oxygen Capillary Lines | [ G5000 ] [ Global Express ] [ Global XRS ] G700-351201-1 |
| Wire Repair - Maintenance Practices - ALL | [ G5000 ] [ Global Express ] [ Global XRS ] SPM20-12-10-02 |
| Fastening Hardware and Safetying Devices - Removal/Installation | [ G5000 ] [ Global Express ] [ Global XRS ] SPM20-50-00-04 |
Troubleshooting Recommendations:
NOTE: The Troubleshooting Tips element of this page includes links to the Reference Information Letter (RIL). It is recommended to perform the Troubleshooting Recommendations that follow before opting for the use of Helium or Nitrogen/Hydrogen mixture as tracer gas.
- GX-0084 - Optional Leak Test of the Oxygen System Using Helium.
- GX-0089 - Optional Leak Test of the Oxygen System Using tracer gas mixture 5% Hydrogen 95% Nitrogen
- Read and familiarize yourself with the notes in the Troubleshooting Tips element of this page prior to starting the troubleshooting. The following recommendations are based on in-service findings.
- To assist in identifying the location of the leak(s) it is suggested to divide the oxygen system into four (4) zones and leak check each zone one at a time.
- Checking for leaks can be accomplished using a leak detection compound or by using the Oxygen Leak Detection Kit (G700-350004-1). Using either method to check for leaks in addition may require cold soaking oxygen components.
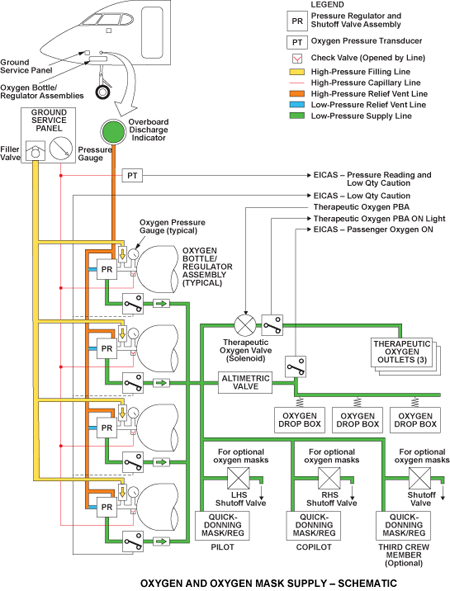
External overboard discharge port:
- If the opportunity presents itself, the following check can be performed as soon as the aircraft lands while the oxygen system components in the FWD equipment compartment are still cold soaked.
- Apply leak detection fluid to the overboard discharge port indicator disc with a small brush.
- If a leak is present, it means the leak comes from one of the four oxygen cylinder regulator low or high pressure relief valves. Continue with next step.
- If no leak is present, continue troubleshooting the following zone.
- As the A/C warms up and the leak witnessed at the overboard discharge port stops, apply dry Ice bags to one regulator of an oxygen Cylinder and Regulator Assembly (CRA) at a time. Allow sufficient time for the regulator to cool down. Apply leak detection fluid to the overboard discharge port.
- If a leak is present, replace the affected CRA and proceed to checking the remainder of the CRAs using the same method.
- If no leak is present, check the next CRA using the same method until the leaking CRA(s) is(are) identified.
NOTE: An alternate method to using dry ice, requires removing the CRA and leaving it in a freezing compartment for multiple hours to allow the CRA to cold-soak. Once cooled, perform leak detection on the high-pressure and low-pressure relief ports of the CRA.
Zone 1: Left Side Cylinders, 2 each.
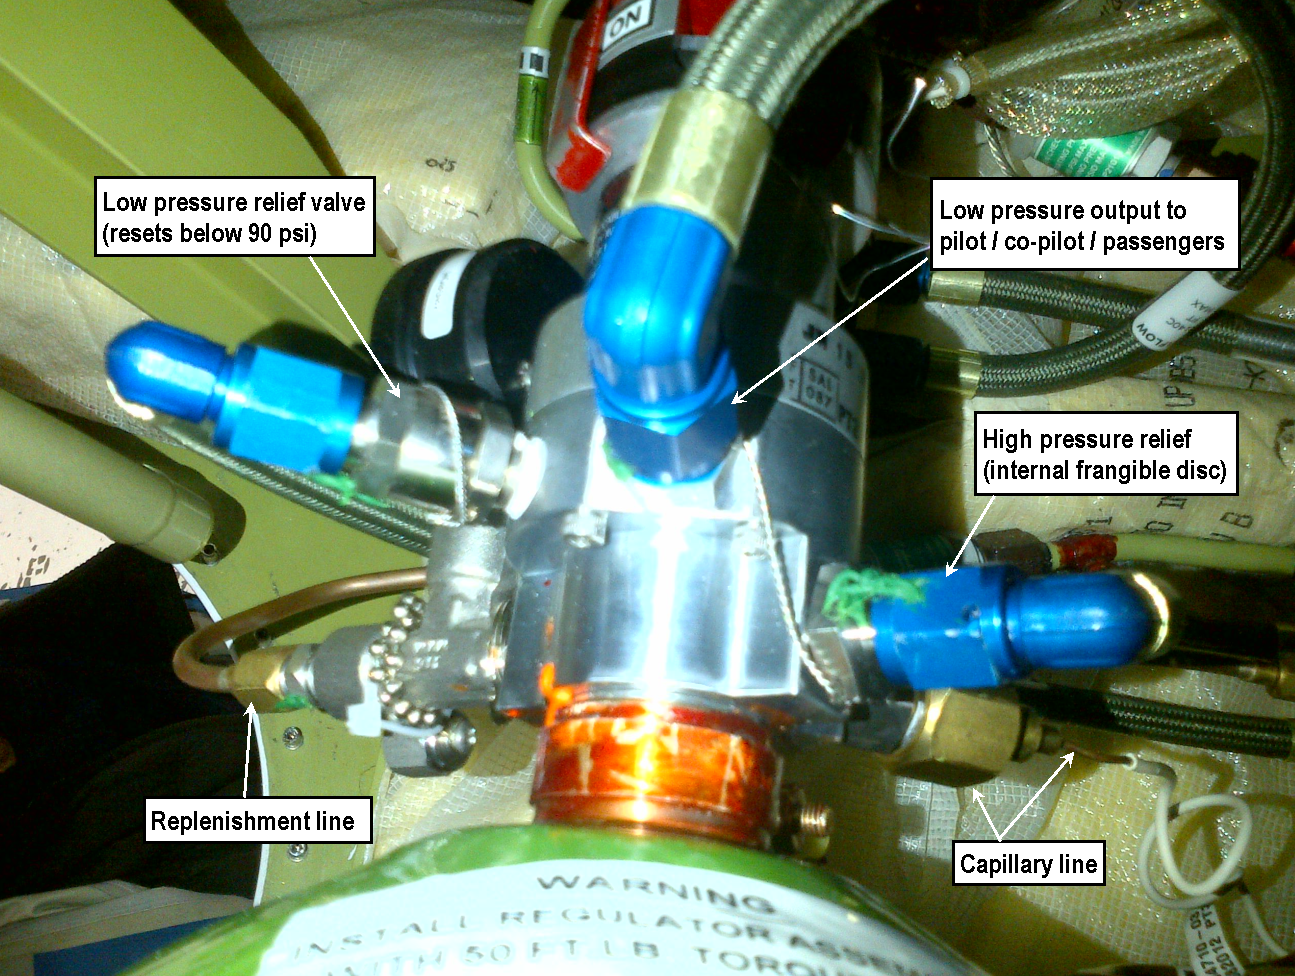
- The regulator has three high pressure ports and three low pressure ports. High pressure ports are ports closest to the cylinder. When the regulator toggle or lever is placed in the "OFF" position, oxygen is not available to the low-pressure outlets through the regulator. High-pressure oxygen is always available at the high-pressure outlets.
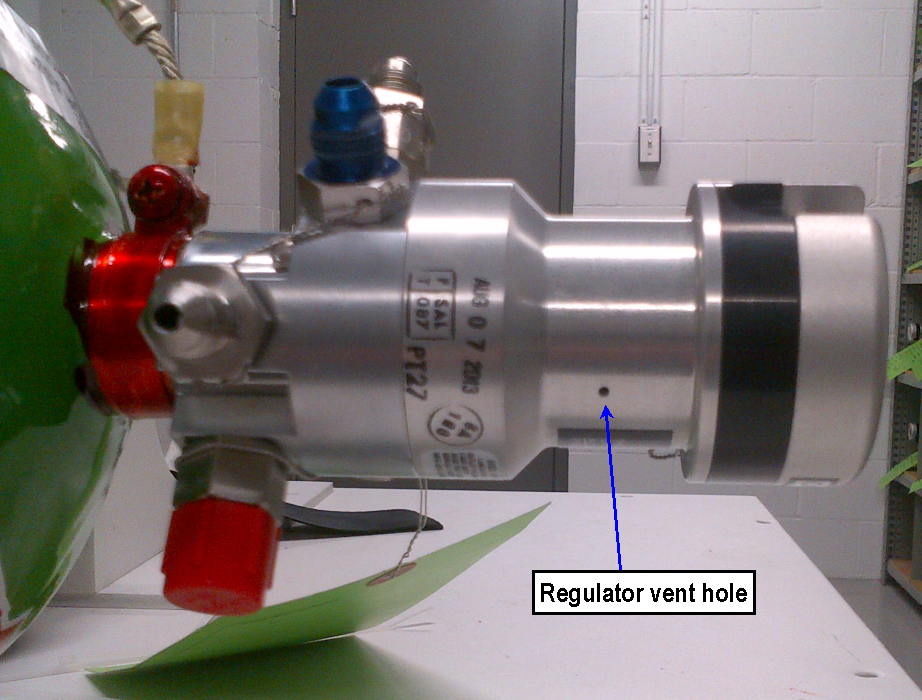
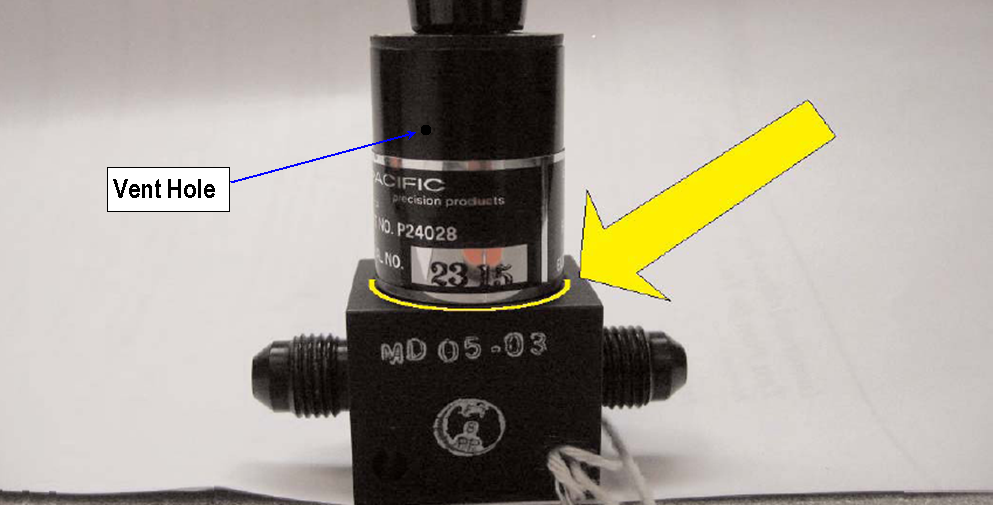
- Open the oxygen cylinder regulators on both left side oxygen cylinders. Use leak detection compound and saturate the vent hole on the oxygen bottle regulators one at a time and watch for bubbles. A mirror is required to see the vent holes. The High Pressure Capillary line, due to the small diameter can be damaged with a small force. Work carefully around the High Pressure Capillary line.
- If leaks are detected, repair or replace as required and do close out.
- If there is no leak, continue with next step.
- Per AMM 35-10-00-000-802, disconnect the 2 overboard discharge lines from the regulators (1 high pressure relief and 1 low pressure relief per bottle). These are AN fittings with 9/16 nut. Using a small brush, saturate the openings one at a time with leak detection compound and make sure there is no bubbling.
- If leaks are detected, repair or replace as required and do close out.
- If there is no leak, continue with next step.
- If it is suspected that a leak begins once the oxygen cylinder regulator assembly is cold soaked during aircraft operations, cold soak the oxygen cylinder regulator and leak check per steps 1 and 2. You may need to remove the oxygen cylinder assembly from the aircraft to facilitate a thorough cold soak prior to leak checking.
- If there is no leak, move to the next zone.
- If there is no leak, move to the next zone.
Zone 2: Right Side Cylinders, 2 each.
- The regulator has three high pressure ports and three low pressure ports. High pressure ports are ports closest to the cylinder. When the regulator toggle or lever is placed in the "OFF" position, oxygen is not available to the low-pressure outlets through the regulator. High-pressure oxygen is always available at the high-pressure outlets.
- Open the oxygen cylinder regulator on both right side oxygen cylinders. Use leak detection compound and saturate the vent hole on the oxygen bottle regulators one at a time and watch for bubbles. A mirror is required to see the vent holes. The High Pressure Capillary line, due to the small diameter can be damaged with a small force. Work carefully around the line.
- If leaks are detected, repair or replace as required and do close out.
- If there is no leak, continue with next step.
- Per AMM 35-10-00-000-802, disconnect the 2 overboard discharge lines from the regulators (1 high pressure relief and 1 low pressure relief per bottle). These are AN fittings with 9/16 nut. Using a small brush, saturate the openings one at a time with leak detection compound and make sure there is no bubbling.
- If leaks are detected, repair or replace as required and do close out.
- If there is no leak, continue with next step.
- If it is suspected that a leak begins once the oxygen cylinder regulator assembly is cold soaked during aircraft operations, cold soak the oxygen cylinder regulator and leak check per steps 1 and 2. You may need to remove the oxygen cylinder assembly from the aircraft to facilitate a thorough cold soak prior to leak checking.
- If there is no leak, move to the next zone.
ZONE 3: Isolate Below Floor
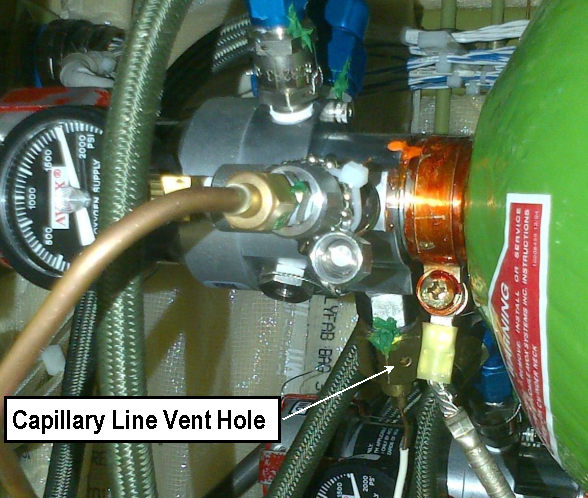
- Use leak detection compound and check for leaks on the High Pressure Capillary Line fittings at the regulator installed on the oxygen cylinder. Verify the capillary lines very carefully at each bottle regulator. Pay close attention to the vent hole on large nut at the regulator. Leakage through this vent hole is an indication that the o-ring has been compromised. The High Pressure Capillary line, due to the small diameter can be damaged with a small force. Work carefully around the line.
- Use leak detection compound and check for leaks at each capillary line connection at the Regulator, unions, tee and bulkhead fittings all the way to and including the Pressure Transducer and Servicing Panel Pressure Gauge. Reference AMM 35-12-09-790-801 Leak Test of the Oxygen Pressure Transducer and AMM 35-12-01-790-801 Leak Test of the Oxygen Ground-Servicing-Panel Pressure-Gauge.
NOTE: Since it is normally not pressurized, to leak check the oxygen servicing line, you will need to apply pressure at the external servicing panel filler valve. The oxygen servicing kart can be used. - Use leak detection compound and check for leaks at the High Pressure Filling Line connections at unions, tees and bulkhead fittings all the way to and including the Oxygen Filler Valve. Reference AMM 35-12-05-790-801 Leak Test of the Oxygen Filler Valve.
- If it is suspected that the leak begins as the High Pressure Capillary Line, Pressure Transducer, Servicing Panel Pressure Gauge, High Pressure Filling Line, Oxygen Filler Valve or Associated Fittings are cold soaked during aircraft operations, cold soak the components and leak check per step 1 - 3.
- If leaks are detected, repair or replace as required and do close out.
- If there is no leak, continue with next step.
- Utilize the G700-350004-1 O2 Leak Test Kit Per RIL GX-0517 to isolate and check for leaks in the High Pressure Capillary Line, Pressure Transducer, Servicing Panel Pressure Gauge, High Pressure Filling Line, Oxygen Filler Valve and Associated Fittings.
- If leaks are detected, repair or replace as required and do close out.
- If there is no leak, continue with next step.
- Use leak detection compound and check for leaks at the Low Pressure Supply Line connections at unions, tees and bulkhead fittings all the way to and including the Low Pressure Supply Line Check Valves and Oxygen Pressure Switches (S48, S49, S50, S51). Reference AMM 35-12-13-790-801 Leak Test of the Oxygen Check Valve and AMM 35-12-17-790-801 Leak Test of the Oxygen Pressure Switch. Also verify that the switch housing and the vent hole are not leaking (bubbling). Cover the vent hole and verify again that the switch housing is not leaking.
- If any damages are detected, repair or replace as required and do close out.
- If there is no damage, continue with next step.
- If it is suspected that a leak begins as the Low Pressure Supply Line, Low Pressure Supply Line Check Valves, Oxygen Pressure Switches (S48, S49, S50, S51) and Associated Fittings are cold soaked during aircraft operations, then cold soak the components and leak check per step 1 - 3.
- Utilize the G700-350004-1 O2 Leak Test Kit per RIL GX-0517 to isolate and check for leaks in the Low Pressure Supply Line, Low Pressure Supply Line Check Valves and Oxygen Pressure Switches (S48, S49, S50, S51) and Associated Fittings.
- If there is no leak, move to the next zone.
Zone 4: Isolate Above Floor
- Use leak detection compound and check for leaks at the Low Pressure Supply Line connections at unions, tees and bulkhead fittings all the way to and including the Oxygen Mask Stowage Box. Reference AMM task 35-11-09-790-801 Leak Test of the Oxygen Mask Stowage-Boxes.
- If leaks are detected, repair or replace as required and do close out.
- If there is no leak, continue with next step.
- Use leak detection compound and check for leaks at the Crew Mask (A193, A194) and connections.
- If leaks are detected, repair or replace as required and do close out.
- If there is no leak, continue with next step.
- Pay particular attention to the t-fittings located below the pilot and copilot oxygen mask stowage boxes, which have been found to leak through micro cracks. These cracks are usually the result of overtorquing.
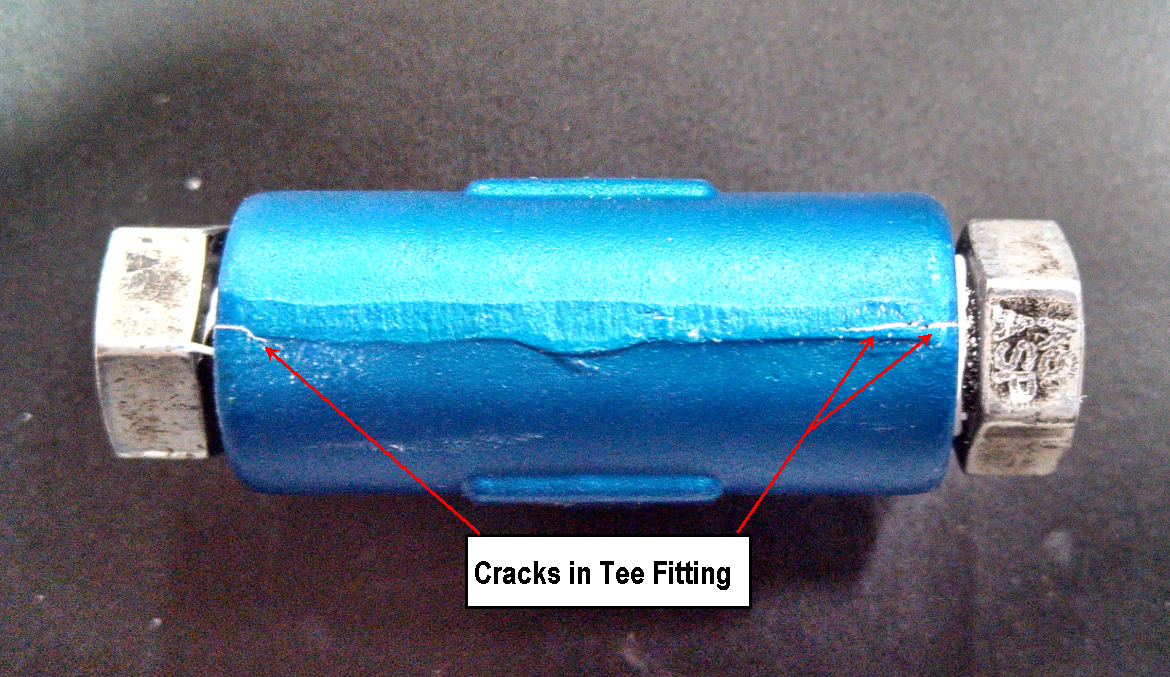
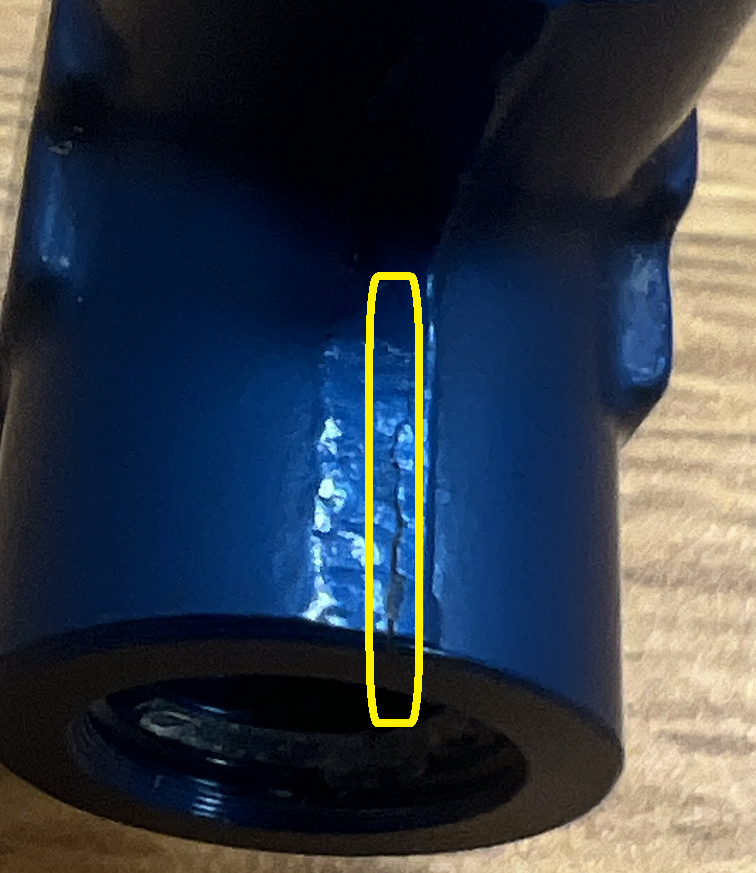
NOTE: If the T-fittings are blue, please note that a new sturdier T-fitting P/N (brown color) has been introduced in the IPC Supersession List and SIPC Alternate Parts Table. - When the oxygen control-panel selector is set to CLOSED, the oxygen supplied is blocked by a valve and oxygen present in the circuit downstream of the valve is isolated and begins to drain through the PAX line venting port on the Altimetric Valve. This leakage is easily audible at the beginning of the draining and becomes more and more quiet as the pressure drops. The time required to drain the line can vary from 20 minutes to one hour. Use leak detection compound and check for leaks at the Passenger Oxygen Control Panel (AP36), Low Pressure Supply Line and Associated Fittings.
- If leaks are detected, repair or replace as required and do close out.
- If there is no leak, continue with next step.
- Utilize the G700-350004-1 O2 Leak Test Kit per RIL GX-0517 to isolate and check for leaks in the Low Pressure Supply Line, Oxygen Mask Stowage Box, Crew Mask and Associated Fittings.
- If no leak is found, move to any zone that has not been leak checked.
- If no leak is found and all zones have been checked for leaks, continue with next step.
- Reference RIL GX-0084 - Optional Leak Test of the Oxygen System Using Helium or GX-0089 - Optional Leak Test of the Oxygen System Using tracer gas mixture 5% Hydrogen 95% Nitrogen for additional troubleshooting.
- Do close out.