08/22/25
Message Overview:
Message Name:
PASSENGER DOOR DOES NOT CLOSE
| Message Code: | 521OBS002 |
| Effectivity: | All |
| System: | Passenger Door |
| System Description: | 52-11-00 |
| Schematic Diagram: | 52-11-00 [ Global Express ] [ G5000 ] [ Global XRS ] |
| Wiring Diagram: | 52-11-01 [ Global Express ] [ G5000 ] [ Global XRS ] - Pre SB 700-52-019 - 9002-9089 52-11-00 [ Global Express ] [ G5000 ] [ Global XRS ] - Post SB 700-52-019 - 9002-9089 52-11-00 [ Global Express ] [ G5000 ] [ Global XRS ] - Pre SB 700-52-019 - 9090-9132 52-11-00 [ Global Express ] [ G5000 ] [ Global XRS ] - Post SB 700-52-019 - 9090-9132 52-11-00 [ Global Express ] [ G5000 ] [ Global XRS ] - Passenger Door - 9133-9158 |
Message Description:
The Passenger Door does not lift to close or cannot be locked.
Possible Causes:
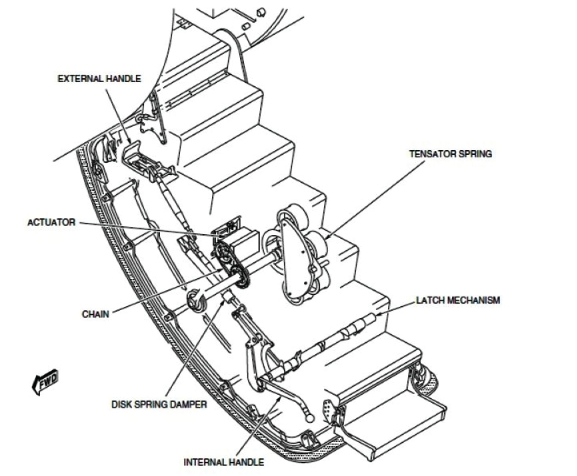
- Passenger-Door Latch-Mechanism Assembly
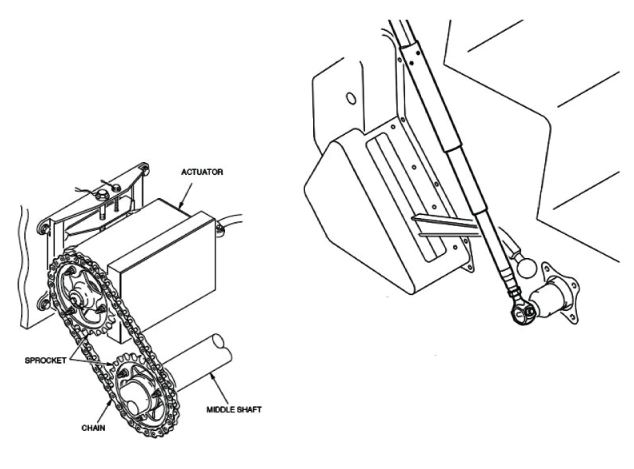
- Passenger-Door Actuator Assembly
- Passenger-Door Torque-Drum Assembly
- Passenger-Door Proximity-Sensor (FWD Claw) (MT42)
- Passenger-Door Proximity-Sensor (AFT Claw) (MT43)
- Passenger-Door Proximity-Sensor (Handle) (MT44)
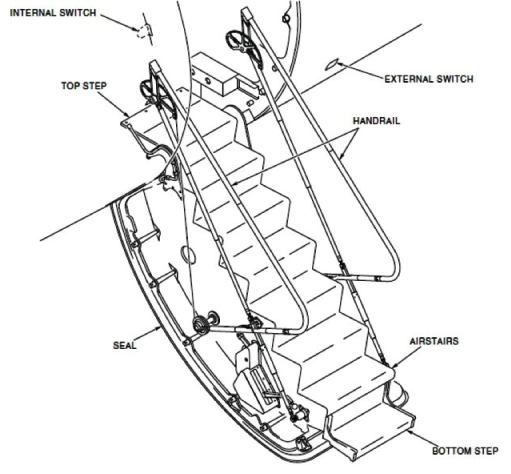
- Passenger-Door Handrail Assembly
- Passenger-Door Cable Assembly
- Passenger-Door Bottom-Step Assembly
- Passenger Door Hinges
Troubleshooting Tips:
Advisory Wire/Service Bulletin:
- AW700-52-0566 - Passenger door external handle detent
- AW700-52-0651 - Passenger door vent flap mechanism
- SB 700-52-041 - Modification - Passenger Door - Installation of Eccentric Bushings in Top Step for Improved Alignment
Forum Articles/Infoservice/Newsletter: None
Quick Links:
| Connect Electrical Power to the Aircraft | AMM 24-00-00-861-801 [ Global Express ] [ G5000 ] [ Global XRS ] |
| Remove the Electrical Power from the Aircraft | AMM 24-00-00-861-802 [ Global Express ] [ G5000 ] [ Global XRS ] |
| Electrical/Electronic Safety Precautions | AMM 24-00-00-910-801 [ Global Express ] [ G5000 ] [ Global XRS ] |
| Operational Test of the Passenger Door | AMM 52-11-00-710-801 [ Global Express ] [ G5000 ] [ Global XRS ] |
| Functional Test of the Passenger Door Mechanism | AMM 52-11-00-720-801 [ Global Express ] [ G5000 ] [ Global XRS ] |
| Rigging of the Passenger Door | AMM 52-11-00-820-801 [ Global Express ] [ G5000 ] [ Global XRS ] |
| Removal of the Passenger Door Latch-Mechanism | AMM 52-11-01-000-801 [ Global Express ] [ G5000 ] [ Global XRS ] |
| Installation of the Passenger Door Latch-Mechanism | AMM 52-11-01-400-801 [ Global Express ] [ G5000 ] [ Global XRS ] |
| Removal of the Passenger Door Internal-Handle | AMM 52-11-05-000-801 [ Global Express ] [ G5000 ] [ Global XRS ] |
| Installation of the Passenger Door Internal-Handle | AMM 52-11-05-400-801 [ Global Express ] [ G5000 ] [ Global XRS ] |
| Removal of the Passenger Door Internal-Switch | AMM 52-11-09-000-801 [ Global Express ] [ G5000 ] [ Global XRS ] |
| Installation of the Passenger Door Internal-Switch | AMM 52-11-09-400-801 [ Global Express ] [ G5000 ] [ Global XRS ] |
| Removal of the Passenger Door External-Handle | AMM 52-11-13-000-801 [ Global Express ] [ G5000 ] [ Global XRS ] |
| Installation of the Passenger Door External-Handle | AMM 52-11-13-400-801 [ Global Express ] [ G5000 ] [ Global XRS ] |
| Removal of the Passenger Door External-Switch | AMM 52-11-17-000-801 [ Global Express ] [ G5000 ] [ Global XRS ] |
| Installation of the Passenger Door External-Switch | AMM 52-11-17-400-801 [ Global Express ] [ G5000 ] [ Global XRS ] |
| Removal of the Passenger Door Handrails | AMM 52-11-21-000-801 [ Global Express ] [ G5000 ] [ Global XRS ] |
| Installation of the Passenger Door Handrails | AMM 52-11-21-400-801 [ Global Express ] [ G5000 ] [ Global XRS ] |
| Removal of the Passenger Door Actuator | AMM 52-11-25-000-801 [ Global Express ] [ G5000 ] [ Global XRS ] |
| Installation of the Passenger Door Actuator | AMM 52-11-25-400-801 [ Global Express ] [ G5000 ] [ Global XRS ] |
| Removal of the Passenger Door Chain | AMM 52-11-33-000-801 [ Global Express ] [ G5000 ] [ Global XRS ] |
| Installation of the Passenger Door Chain | AMM 52-11-33-400-801 [ Global Express ] [ G5000 ] [ Global XRS ] |
| Removal of the Passenger Door Tensator-Springs | AMM 52-11-41-000-801 [ Global Express ] [ G5000 ] [ Global XRS ] |
| Installation of the Passenger Door Tensator-Springs | AMM 52-11-41-400-801 [ Global Express ] [ G5000 ] [ Global XRS ] |
| Removal of the Passenger Door Cables | AMM 52-11-49-000-801 [ Global Express ] [ G5000 ] [ Global XRS ] |
| Installation of the Passenger Door Cables | AMM 52-11-49-400-801 [ Global Express ] [ G5000 ] [ Global XRS ] |
| Removal of the Passenger Door Bottom-Step | AMM 52-11-57-000-801 [ Global Express ] [ G5000 ] [ Global XRS ] |
| Installation of the Passenger Door Bottom-Step | AMM 52-11-57-400-801 [ Global Express ] [ G5000 ] [ Global XRS ] |
| Removal of the Passenger Door Proximity-Sensors | AMM 52-70-01-000-801 [ Global Express ] [ G5000 ] [ Global XRS ] |
| Installation of the Passenger Door Proximity-Sensors | AMM 52-70-01-400-801 [ Global Express ] [ G5000 ] [ Global XRS ] |
| Safety Precautions - Maintenance Practices - ALL | SPM 20-00-01-02 [ Global Express ] [ G5000 ] [ Global XRS ] |
Troubleshooting Recommendations:
NOTE: When the fault has been isolated and corrected, perform the operational and functional tests, and do close out.
- Perform visual inspection of disconnect, damage, jam, corrosion and contamination of the following components if there is a fault at the LRUs of the passenger door latch mechanism assembly.
- internal handle
- torque tube
- forward and aft G-lock cams
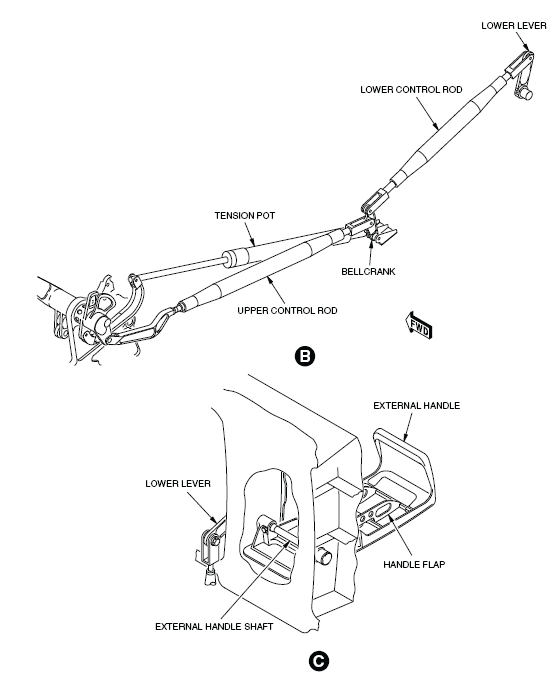
- upper control rod assembly
- bell-crank assembly
- lower control rod assembly
- lower lever
- external handle shaft
- external handle
- external handle flap
- tension pot assembly
- pivot tube
- forward and aft support assembly
- forward and aft adjustment stud
- pillar tube
- forward and aft G-lock hook
- G-lock roller and pin
- forward and aft G-lock shaft
- airstairs roller pin
- locking arm
- knock-off lever
- knock-on arm
- If there is a disconnect, damage, jam, corrosion and contamination, reconnect the disconnect, repair or replace the broken/defective components and treat corrosion/contamination and do close out.
- If there is no disconnect, damage, jam, corrosion and contamination, continue with next step.
- Perform visual inspection of disconnect, damage, jam, corrosion and contamination of the following if there is a fault at the LRUs of the passenger door actuator assembly.
- passenger door actuator including gearbox, electrical wiring, electronic pack, power supply and clutch
- sprockets at the passenger door actuator and the middle shaft
- chain at the passenger door actuator
- middle shaft at the inner and outer sides of the passenger door airstairs
- mechanical adjustment of the passenger door actuator mechanism (tension on the passenger door chain)
NOTE: If the tension of the passenger door chain is adjusted, perform a check of the rigging of the passenger door actuator.
- If there is a disconnect, damage, jam, corrosion and contamination, reconnect the disconnect, repair or replace the broken/defective components and treat corrosion/contamination and do close out.
- If there is no disconnect, damage, jam, corrosion and contamination, continue with next step.
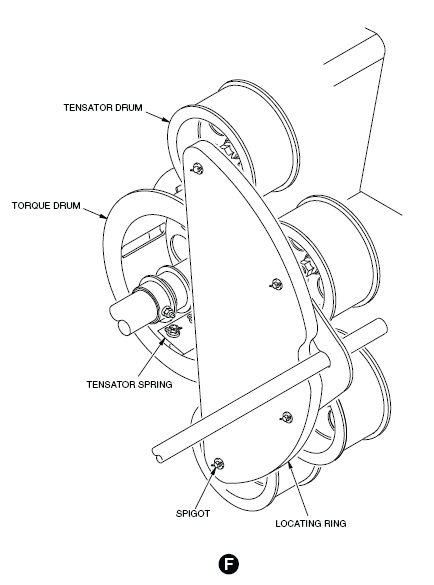
- Perform visual inspection of disconnect, damage, jam, corrosion and contamination of the following if there is a fault at LRUs of the passenger door torque drum assembly.
- torque drum
- tensator drum
- tensator springs
- locating ring
- mechanical adjustment of the passenger door tensator spring assembly (tension check)
- If there is a disconnect, damage, jam, corrosion and contamination, reconnect the disconnect, repair or replace the broken/defective components and treat corrosion/contamination and do close out.
- If there is no disconnect, damage, jam, corrosion and contamination, continue with next step.
- Perform visual inspection of disconnect, damage, jam, corrosion and contamination of the following if there is a fault of the passenger door proximity sensors.
- electrical wiring
- mechanical adjustment of the passenger door proximity sensors (clearance check)
- If there is a disconnect, damage, jam, corrosion and contamination, reconnect the disconnect, repair or replace the broken/defective components and treat corrosion/contamination and do close out.
- If there is no disconnect, damage, jam, corrosion and contamination, continue with next step.
- Perform visual inspection of disconnect, damage, jam, corrosion and contamination of the following if there is a fault at LRUs of the passenger door assembly. Handrails that need lubrication, are bent or damaged will cause excessive resistance when closing the door. Watch the handrail when closing and opening the door and make sure there is no jerking or slipping motion. They should fall free when opening the door with no resistance. Supporting the door halfway up will facilitate inspection and lubrication of the handrail.
- Check the Telescopic strut for damage
- Check for binding or excessive play in the pivots
- Perform the Lubrication of the Passenger Door Handrail Telescopic Struts as per AMM
NOTE: Make sure to use a non-staining (Clear) dry lubricant when lubricating.
- If there is a disconnect, damage, jam, corrosion and contamination, reconnect the disconnect, repair or replace the broken/defective components and treat corrosion/contamination and do close out.
- If there is no disconnect, damage, jam, corrosion and contamination, continue with next step.
- Perform a check of the handrail stops and make sure that there is proper clearance when the door is closed. If there is no gap, it could be difficult to close the door from the outside. Make sure that you adjust both sides of the handrail equally. If you do not, you can cause damage to the handrail. Refer to AMM handrail rigging task.
- If system checks are good, do close out.
- If fault remains, continue with next step.
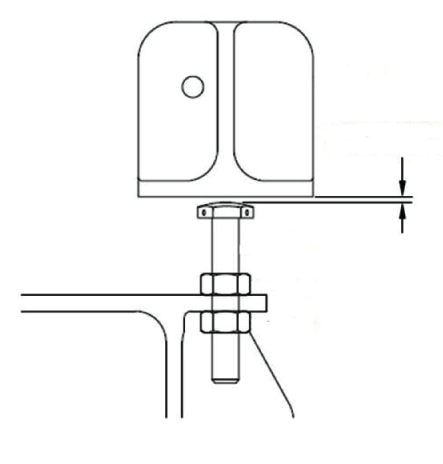
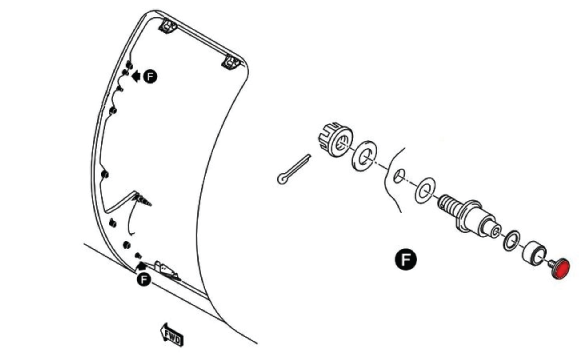
- Perform a visual inspection of the guide pins and make sure the button on the end of the guide pin is not unscrewed and preventing the door from closing during the last portion of the door travel before latching.
- If system checks are good, do close out.
- If fault remains, continue with next step.
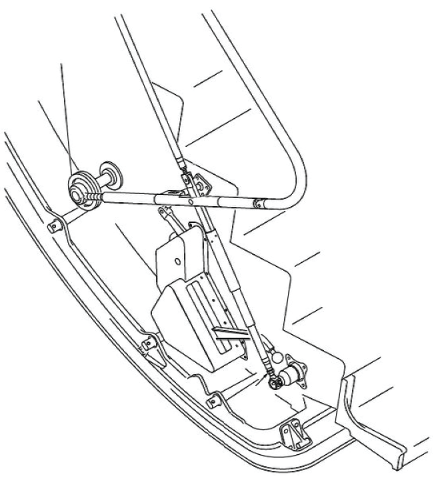
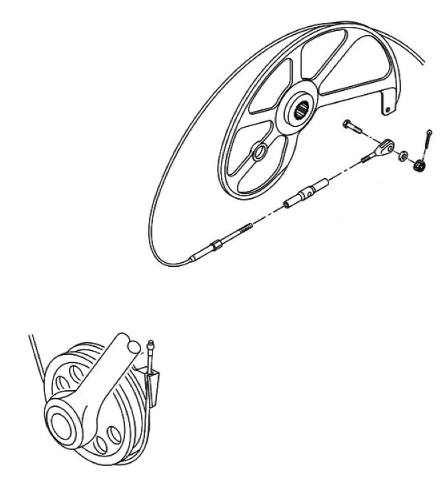
- Perform visual inspection of disconnect, damage, jam, corrosion and contamination of the following if there is a fault at the passenger door cables or at the cable assembly LRUs.
- forward and aft passenger door cable
- forward and aft cable pulley
- mechanical adjustment of the passenger door cables (rigging of the passenger door cables)
- If there is a disconnect, damage, jam, corrosion and contamination, reconnect the disconnect, repair or replace the broken/defective components and treat corrosion/contamination and do close out.
- If there is no disconnect, damage, jam, corrosion and contamination, continue with next step.
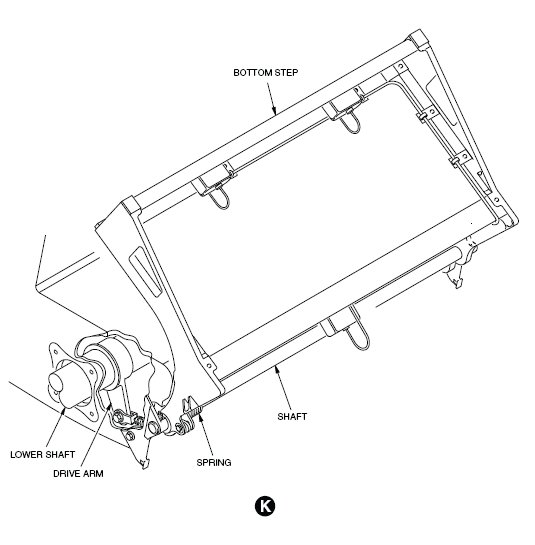
- Perform visual inspection of disconnect, damage, jam, corrosion and contamination of the following if there is a fault at passenger door bottom step or the assembly LRUs.
- passenger door bottom step
- drive arm
- folding step shaft
- mechanical adjustment of the passenger door bottom step (rigging of the passenger door bottom step)
- If there is a disconnect, damage, jam, corrosion and contamination, reconnect the disconnect, repair or replace the broken/defective components and treat corrosion/contamination and do close out.
- If there is no disconnect, damage, jam, corrosion and contamination, continue with next step.
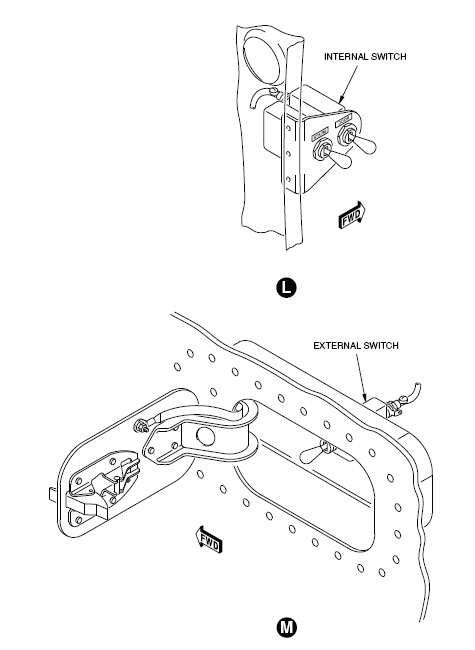
- Perform visual inspection of disconnect, damage, jam, corrosion and contamination of the following if there is a fault at passenger door switches.
- passenger door switches
- If there is a disconnect, damage, jam, corrosion and contamination, reconnect the disconnect, repair or replace the broken/defective components and treat corrosion/contamination and do close out.
- If there is no disconnect, damage, jam, corrosion and contamination, continue with next step.
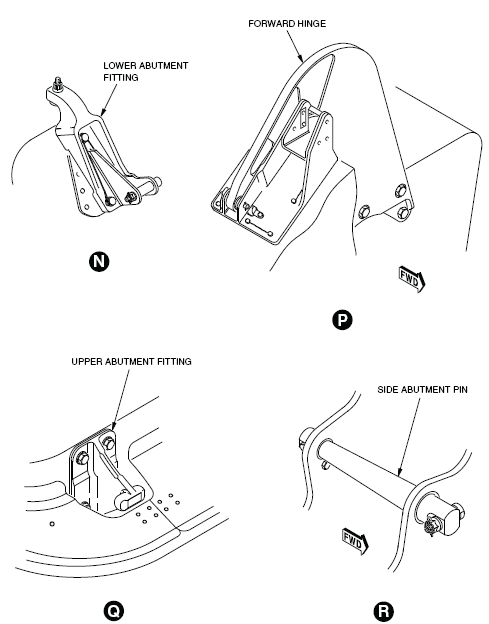
- Perform visual inspection of disconnect, damage, jam, corrosion and contamination of the following if there is a fault at passenger door connection points
- forward and aft passenger door hinges
- top, the bottom, the forward side, and the aft side abutments (14 in total)
- adjustment of the passenger door abutments (rigging of the passenger door abutments)
- If there is a disconnect, damage, jam, corrosion and contamination, reconnect the disconnect, repair or replace the broken/defective components and treat corrosion/contamination and do close out.
- If there is no disconnect, damage, jam, corrosion and contamination, continue with next step.
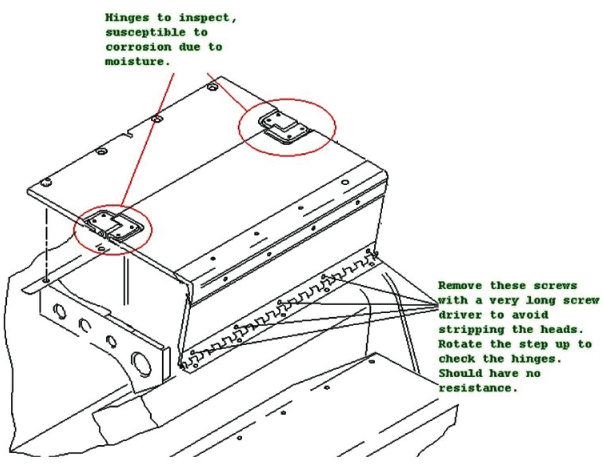
- Perform a visual of the top step hinges for wear, corrosion and binding condition. Please note SB 700-52-041 introduces new eccentric bushings for improved alignment and durability. Remove top step screws and try to lift the step to check hinge stiffness.
NOTE: Do not close the door with top step half connected. Remove fully or re-attach before attempting to close the door.- If the door is able to lift or stalls, do close out.
- If the door cannot lift or stalls, check the door for excessive weight and continue with next step.
- Inspect storage bins for added weight (tools and supplies) that may exceed weight limitation. Door may have been exposed to the elements or water may have leaked through the flapper door. Water can retain in the insulation bags. Moisture will not dry out quickly due to limited airflow. Excess weight may prematurely degrade the door motor. Inspect the insulation bags below the flapper door. To perform a quick inspection, lift the lower door step, reach in and squeeze the exposed bags and the outer shell bags through one of the lightening holes on the side.If water is found, remove and dry out the bags or replace bags.
- Perform the tests that follow to make sure that the passenger door closes satisfactorily:
- Operational test of the passenger door
- Functional test of the passenger door
- Do close out.