

06/27/19
Message Overview:
Fault Message:
FLAP MECHANICAL DISCONNECT
Fault Code:
2750037STD
Associated CAS:
| Reporting LRU: | Slat/Flap Control Unit (SFCU) |
| System Description: | 27-52-00 |
| Schematic Diagram: | 27-50-00 [ Global Express ] [ G5000 ] [ Global XRS ] |
| Wiring Diagram: | 27-50-03 [ Global Express ] [ G5000 ] [ Global XRS ] |
Fault Description:
One of the conditions that follow occurs:
- There is an asymmetry condition detected in the Flap system
- The difference between the Right and Left Flap position is more than 16 resolver degrees or a rate of 4.255 Deg/Second
Possible Causes:
- Left Flap Resolver (MT67)
- Right Flap Resolver (MT72)
- Slat/Flap Control Unit (SFCU) 1 (A124)
- Slat/Flap Control Unit (SFCU) 2 (A95)
- Associated Wiring
Troubleshooting Tips:
Advisory Wire/Service Bulletin: None
Forum Articles/Infoservice/Newsletter: None
Performing a SLAT/FLAP RESET on the EMS CDU may clear this fault.
NOTE: Wait at least one minute after SFCU reset to allow self-test to run.
Performing the clear latched fault may also clear this fault. The latched fault can be cleared by doing the AMM 27-51-05-910-801 "Clear Slat/Flap Control Unit (SFCU) Latched Faults".
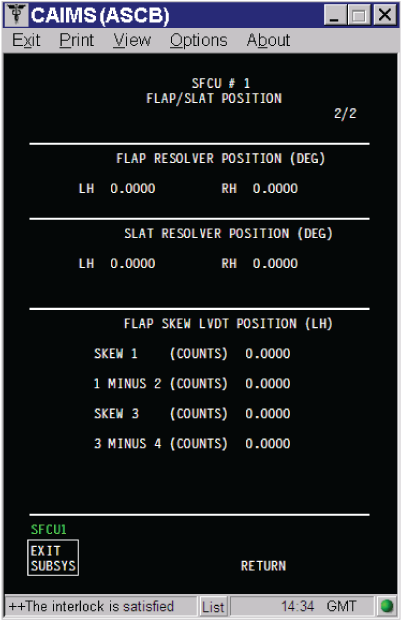
The resolver can be monitored in the CAIMS system diagnostic:
- SYSTEM DIAG
- 27-00 FLIGHT CONTROLS
- SLAT/FLAP CONTROL UNIT #1(2)
- LRU TEST
- SLAT/FLAP POSITION - RAW DATA - SFCU1(2)
- CONFIRM
Quick Links:
| Clear Slat/Flap Control Unit (SFCU) Latched Faults | AMM 27-51-05-910-801 [ Global Express ] [ G5000 ] [ Global XRS ] |
| Removal of the Slat/Flap Control Unit (SFCU) | AMM 27-51-05-000-801 [ Global Express ] [ G5000 ] [ Global XRS ] |
| Installation of the Slat/Flap Control Unit (SFCU) | AMM 27-51-05-400-801 [ Global Express ] [ G5000 ] [ Global XRS ] |
| Rigging of the Flap System | AMM 27-52-00-820-801 [ Global Express ] [ G5000 ] [ Global XRS ] |
| Removal of the Flap Resolvers | AMM 27-52-49-000-801 [ Global Express ] [ G5000 ] [ Global XRS ] |
| Installation of the Flap Resolvers | AMM 27-52-49-400-801 [ Global Express ] [ G5000 ] [ Global XRS ] |
| Access to System Diagnostics | AMM 45-45-00-970-804 [ Global Express ] [ G5000 ] [ Global XRS ] |
| Access to Non-Volatile Memory (NVM) Management | AMM 45-45-00-970-822 [ Global Express ] [ G5000 ] [ Global XRS ] |
| Wire Repair - Maintenance Practices - ALL | SPM 20-12-10-02 [ Global Express ] [ G5000 ] [ Global XRS ] |
Troubleshooting Recommendations:
- Confirm that both SFCUs are reporting the "flap mechanical disconnect" in CAIMS.
- If both SFCUs are reporting, go to step 3.
- If only one SFCU is reporting, continue with next step.
- Perform the electrical rigging of the flaps on the SFCU that was reporting the fault.
- If system checks are good, do close out.
- If fault remains (coming back on the next selection), go to step 14.
- Monitor the flaps resolvers in CAIMS and confirm that the left and right resolvers on both SFCUs are reporting the same position.
- If the left and right resolvers are reporting a different position on both SFCU, go to step 7.
- If all the resolvers are reporting the same position, continue with next step.
NOTE: The resolvers can have 1 degree different in the reading.
- Clear the latched fault in CAIMS, cycle the flaps to OUT back to IN.
- If system checks are good, do close out.
- If fault remains, continue with next step.
- Perform a visual check to make sure there is no real mechanical disconnect of the flaps.
- If there is no disconnect, go to step 14.
- If there is disconnect, continue with next step.
- Repair mechanical disconnect and run rigging.
- If system checks are good, do close out.
- If fault remains, go to step 14.
- Perform an inspection of the flap system torque tubes and angle gearboxes.
- If inspection is good, go to step 9.
- If anomalies are found, continue with next step.
NOTE: Many issues were reported related to mechanical disconnect fault were the torques tubes connected close to the Power drive unit were not installed properly the last time after the flaps were rigged.
- Repair defects and run rigging
- If system checks are good, do close out.
- If fault remains, continue with next step.
- If no asymmetry is found between the left and right flaps surfaces, manual retract the flaps to IN as per the procedure that follow and replace the flap resolver not reporting 0 degree on the flap rigging page.
- SYSTEM DIAG
- 27-00 FLIGHT CONTROLS
- SLAT/FLAP CONTROL UNIT #1(2)
- LRU TEST
- FLAP RIGGING - SFCU1(2)
- CONFIRM
- Highlight "FLAP RIG ENABLE COMMAND" and Select
- Highlight "RELEASE L FLAP ABRAKE" and Select
- Highlight "RELEASE R FLAP ABRAKE" and Select
- Highlight "RELEASE FLAP MOTOR BRAKE" and Select
- Manually turn the torques tubes near the flap power drive unit until the flaps are fully retracted
- Highlight "ENGAGE L FLAP ABRAKE" and Select
- Highlight "ENGAGE R FLAP ABRAKE" and Select
- Highlight "ENGAGE FLAP MOTOR BRAKE" and Select
- CONFIRM
- CONFIRM
- TEST CMPLT
NOTE: The procedure has to be completed to allow the SFCU going out of the maintenance mode. If these steps are not followed, the resolvers will be reporting around 20 degrees. - FLAP RIGGING - SFCU1(2)
- CONFIRM
- Record the resolver position and replace the flap resolver not reporting 0 degree
- Perform the rigging of flaps if both resolver are reporting 0 degree on the flap rigging page with the flaps IN.
- If system checks are good, do close out.
- If fault remains (coming back at the same position), continue with next step.
- Swap SFCUs.
- If system checks are good, replace defective SFCU and do close out.
- If fault remains, continue with next step.
- Perform wiring checks between the applicable SFCU rack and Flap resolvers.
- If wiring checks are not good, repair defective wiring as required and do close out.
- If wiring checks are good, continue with next step.
- Replace defective resolvers.
- If system checks are good, do close out.
- If fault remains, continue with next step.
- Download both SFCUs NVMs and send to AC YUL.
- Do close out.