01/04/24
Message Overview:
Message Name:
LEFT HI PRESS BLEED SOV CMD /L HPV
Message Code:
3615320BMC
| Reporting LRU: | Bleed Management Controller (BMC) |
| Associated CAS: | L BLEED SYS FAIL (Caution) L BLEED FAULT (Advisory) |
| System Description: | 36-11-00 - Bleed Air System |
| Schematic Diagram: | [ G5000 ] [ Global Express ] [ Global XRS ] SSM 36-11-00-101 - Bleed Air System - Electrical Schematic |
| Wiring Diagram: | [ G5000 ] [ Global Express ] [ Global XRS ] WM 30-11-00-1_001 - Sheet 1 - Left Wing Distribution (Pre SB 700-30-023) - [9004-9010] [ G5000 ] [ Global Express ] [ Global XRS ] WM 30-11-01-1_001 - Sheet 1 - Pre SB 700-1A11-30-005 - [9127-9215] [ G5000 ] [ Global Express ] [ Global XRS ] WM 30-11-01-1_001 - Sheet 1 - Pre SB 700-30-023 - [9159 TO 9215] [ G5000 ] [ Global Express ] [ Global XRS ] WM 71-50-00-1_001 - Sheet 1 - EEC to Aircraft Pylon Disconnect (Lane A) - ALL [ G5000 ] [ Global Express ] [ Global XRS ] WM 71-50-01-1_001 - Sheet 1 - EEC To Aircraft Pylon Disconnect (Lane A) - ALL |
Message Description:
The High Pressure Bleed Shut-off Valve (HPV) failed in the open or closed position. Inhibited during Take-Off and Landing.
Possible Causes:
- Left High Pressure Bleed Shut-off Valve (L HPV)
- Secondary Power Distribution Assembly 2 (SPDA) (A14)
- Bleed Management Controller 1 (BMC) (A69)
- Data Acquisition Unit 3 (DAU) (A30)
- Associated Wiring
Troubleshooting Tips:
Advisory Wire/Service Bulletin:
- AW700-36-0365 - Bleed Management Controller - Data Gathering to Reduce No Fault Found (NFF) rate
Forum Articles/Infoservice/Newsletter:
- Forum Article 2011-VOL 8 issue 23 - Bleed Management Controller (BMC) Top 10 No Fault Found (NFF) vs. Reliability Improvement Modification Program (RIMP) implementation
Flight Operation Notifications Manual (FONM): None
NOTES:
- Always verify you are working with the current document revision. Access the CIC website to ensure the latest document revision.
- Questionnaire for replacing the BMC. Follow instructions using this (Fill out form)

Quick Links:
| Grounding of the Aircraft | [ G5000 ] [ Global Express ] [ Global XRS ] AMM10-11-00-867-801 |
| Removal of the Covers and Plugs | [ G5000 ] [ Global Express ] [ Global XRS ] AMM10-12-00-020-801 |
| Installation of the Covers and Plugs | [ G5000 ] [ Global Express ] [ Global XRS ] AMM10-12-00-420-801 |
| Standard Aircraft Configuration for Maintenance | [ G5000 ] [ Global Express ] [ Global XRS ] AMM12-00-00-867-801 |
| Aircraft Walkaround (for Maintenance) | [ G5000 ] [ Global Express ] [ Global XRS ] AMM12-00-00-867-802 |
| Connect Electrical Power to the Aircraft | [ G5000 ] [ Global Express ] [ Global XRS ] AMM24-00-00-861-801 |
| Remove the Electrical Power from the Aircraft | [ G5000 ] [ Global Express ] [ Global XRS ] AMM24-00-00-861-802 |
| Electrical/Electronic Safety Precautions | [ G5000 ] [ Global Express ] [ Global XRS ] AMM24-00-00-910-801 |
| Electrostatic Discharge Safety Precautions | [ G5000 ] [ Global Express ] [ Global XRS ] AMM24-00-00-910-802 |
| Removal of the Secondary-Power Distribution Assemblies | [ G5000 ] [ Global Express ] [ Global XRS ] AMM24-62-01-000-801 |
| Installation of the Secondary-Power Distribution Assemblies | [ G5000 ] [ Global Express ] [ Global XRS ] AMM24-62-01-400-801 |
| Operational Test of the Secondary-Power Distribution Assembly 2 | [ G5000 ] [ Global Express ] [ Global XRS ] AMM24-62-01-710-802 |
| Operational Test of the Data Acquisition System | [ G5000 ] [ Global Express ] [ Global XRS ] AMM31-42-00-710-801 |
| Removal of the Data Acquisition Units (DAU) | [ G5000 ] [ Global Express ] [ Global XRS ] AMM31-42-01-000-801 |
| Installation of the Data Acquisition Units (DAU) | [ G5000 ] [ Global Express ] [ Global XRS ] AMM31-42-01-400-801 |
| Removal of the High-Pressure-Bleed Shutoff Valve | [ G5000 ] [ Global Express ] [ Global XRS ] AMM36-11-01-000-801 |
| Installation of the High-Pressure-Bleed Shutoff Valve | [ G5000 ] [ Global Express ] [ Global XRS ] AMM36-11-01-400-801 |
| Operational Test of the High-Pressure-Bleed Shutoff Valve | [ G5000 ] [ Global Express ] [ Global XRS ] AMM36-11-01-710-801 |
| Removal of the Bleed Management Controller | [ G5000 ] [ Global Express ] [ Global XRS ] AMM36-11-33-000-801 |
| Installation of the Bleed Management Controller | [ G5000 ] [ Global Express ] [ Global XRS ] AMM36-11-33-400-801 |
| Operational Test of the Bleed Management Controller | [ G5000 ] [ Global Express ] [ Global XRS ] AMM36-11-33-710-801 |
| CAIMS PMAT General Instructions | [ G5000 ] [ Global Express ] [ Global XRS ] AMM45-45-00-970-801 |
| Access to Active Faults | [ G5000 ] [ Global Express ] [ Global XRS ] AMM45-45-00-970-802 |
| Access to Stored Faults | [ G5000 ] [ Global Express ] [ Global XRS ] AMM45-45-00-970-803 |
| Access to System Diagnostics | [ G5000 ] [ Global Express ] [ Global XRS ] AMM45-45-00-970-804 |
| Flight Deck Effect to Fault Correlations | [ G5000 ] [ Global Express ] [ Global XRS ] AMM45-45-00-970-821 |
| Wire Repair - Maintenance Practices - ALL | [ G5000 ] [ Global Express ] [ Global XRS ] SPM20-12-10-02 |
Troubleshooting Recommendations:
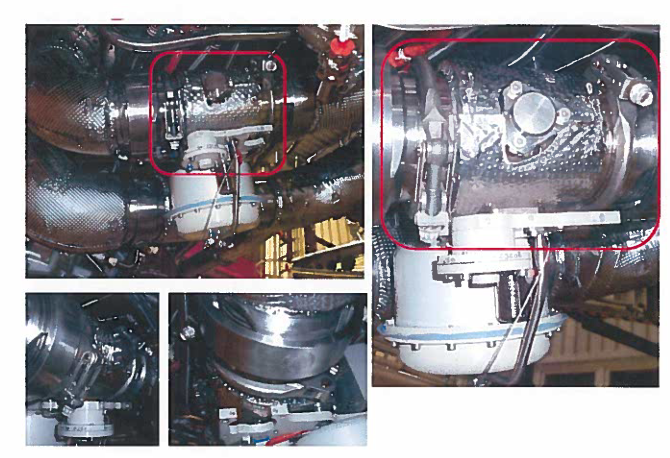
- Inspect the HP valve.
NOTE: To prevent distortion of the valve body during installation follow the instructions regarding the orientation of the couplings in AMM task "36-11-01-400-801 - Installation of the High-Pressure-Bleed Shutoff Valve".- If defects found, go to step 3.
- If no defects can be seen, continue with next step.
- Interchange the L HP Valve with the R HP valve and Run the aircraft engines to test the system.
- If system checks are good, replace L HP and do close out.
- If fault remains, continue with next step.
- Perform wiring checks between the L HPV and its ground.
- If wiring checks are not good, repair defective wiring as required and do close out.
- If wiring checks are good, continue with next step.
- Perform wiring checks between the L HPV and BMC 1.
- If wiring checks are not good, repair defective wiring as required and do close out.
- If wiring checks are good, continue with next step.
- Perform wiring checks between the L HPV and SPDA 2.
- If wiring checks are not good, repair defective wiring as required and do close out.
- If wiring checks are good, continue with next step.
- Perform wiring checks between the L HPV and DAU 3.
- If system checks are not good, repair defective wiring as required and do close out.
- If wiring checks are good, continue with next step.
- Interchange BMC 1 with BMC 2.
- If system checks are good, replace BMC 1 and do close out.
- If fault remains, continue with next step.
- Interchange DAU 3 with DAU 1.
- If system checks are good, replace DAU 3 and do close out.
- If fault remains, continue with next step.
- Replace SPDA 2.
- Do close out.